
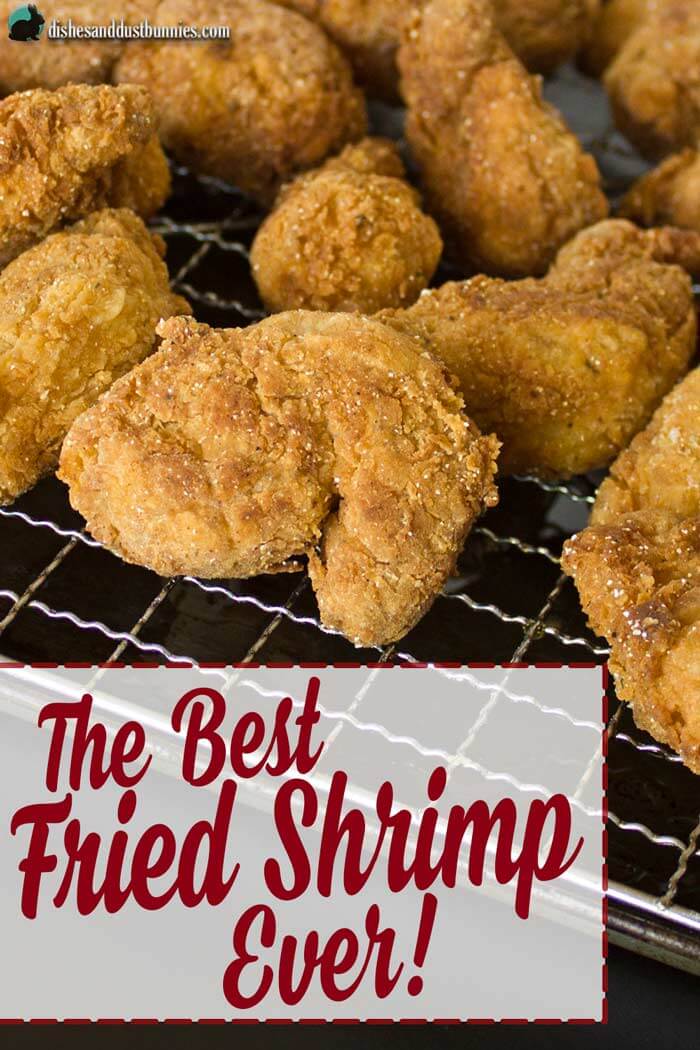
The Best Crispy Fried Shrimp Recipe
Dive into our absolutely delicious crispy fried shrimp recipe! Learn the secrets to the best shrimp batter for incredibly crunchy, breaded shrimp that's restaurant-quality from the comfort of your own home. This delicious recipe will guide you through each step, ensuring your fried shrimp turns out perfectly crispy every time.
Have you ever taken one bite of something and nearly fallen to your knees because of the pure deliciousness you experienced?
Well, my dear… if you haven't yet been lucky enough to experience this, let me help you! 😀 Get ready to have THE BEST fried shrimp you've ever tasted!
This recipe is something I've been working on for a while now, and it's finally ready to share with you. 🙂
Before this post, I've tested a couple of different versions of this, but the recipe needed a little boost … a little something to push it to the exact level of yumminess I wanted to give you.
And I must say, this fried shrimp has been one of THE BEST recipes I've EVER posted to Dishes and Dust Bunnies. I'm not joking. It's seriously THAT good!
What makes this fried shrimp so incredibly good is not only the wickedly awesome combination of seasonings used in the batter and the breading. Credit also goes to a little bit of cornmeal and some panko breadcrumbs to make them fry up nice and crunchy…
….drool….
Sorry, what was I saying?
Oh yes, crunchy and delicious breading! So amazing!
I hope you enjoy this recipe! ❤️ If you give it a try, please let me know how it turned out for you in the comments section at the bottom of the page or share a pic of your om noms on Instagram and tag @dishesanddustbunnies! ❤️
What Is Fried Shrimp Made of?
What is shrimp batter made of?
This delightful recipe features succulent jumbo shrimp coated in a delectable batter made from eggs, all-purpose flour, a hint of salt, baking powder, white pepper, and milk.
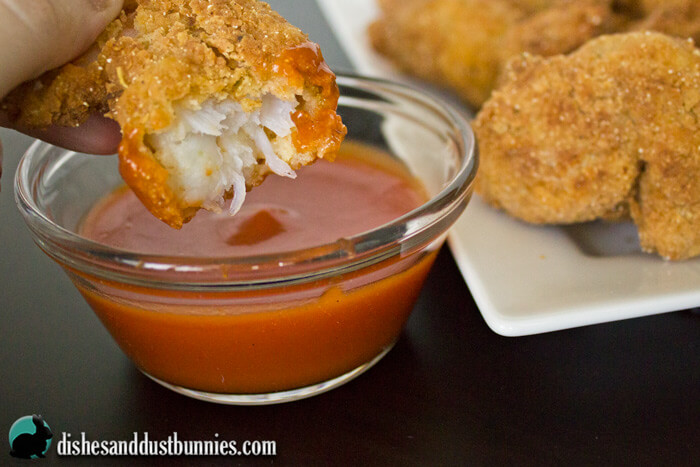
The shrimp are then perfectly breaded with a mix of flour, cornmeal, Panko bread crumbs, and an exquisite blend of seasonings including oregano, ground ginger, crushed bay leaf, crushed celery seed, mustard powder, smoked paprika, Cajun seasoning, and a touch of salt and pepper.
Be sure to see the recipe card at the bottom of the post for full ingredients & instructions!
How to Make Southern Fried Shrimp – Overview
You can find the full recipe details, including ingredient amounts and the full instructions in the recipe card at the bottom of this post, but first, here's a quick overview of how to make this homemade Southern fried shrimp recipe from scratch!
Start by preheating your oven and preparing two separate mixtures for batter and breading. Dip shrimp in the breading, batter, and then coat shrimp in the breading again before they're placed on a baking sheet to chill in the refrigerator. This step is important to coat the shrimp so the breading doesn't fall off.
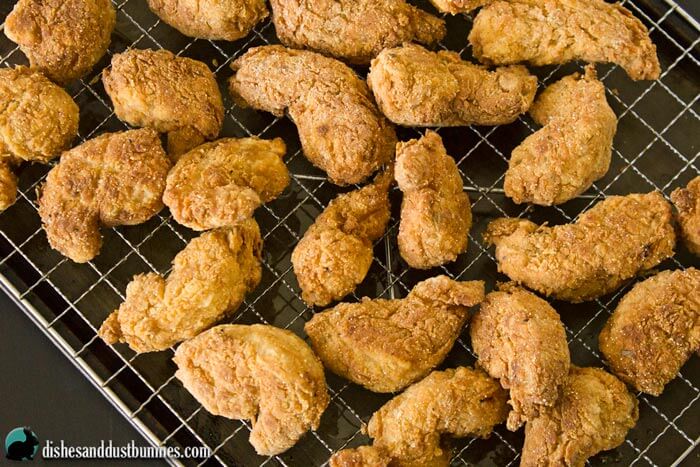
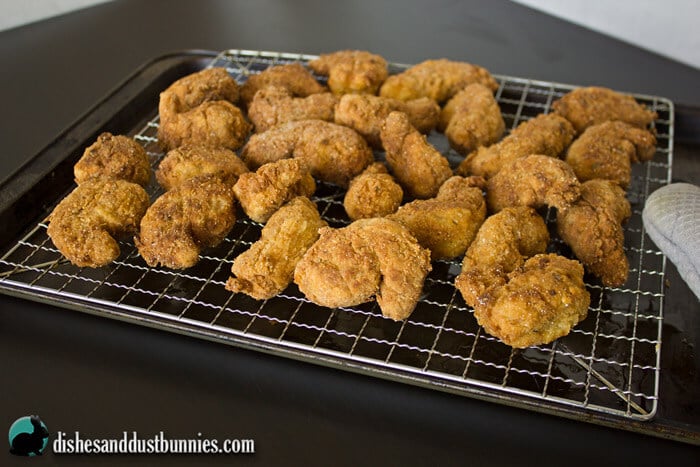
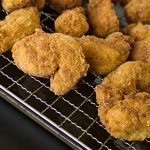
While the shrimp chill, heat your oil in a pot or deep fryer. You'll also need to set up a baking sheet with a wire rack in the oven to keep the finished crispy fried shrimp warm while frying the others.
Fry shrimp in batches, taking about 3-4 minutes per side. Using a metal strainer, remove the shrimp from the hot oil and place them in the oven to stay warm while you finish frying the remaining shrimp.
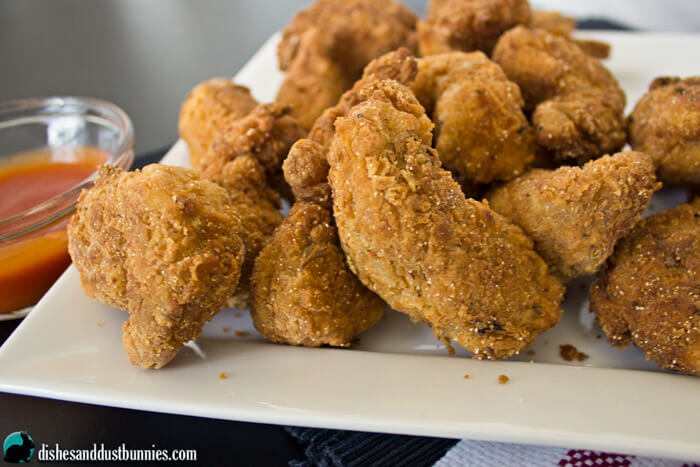
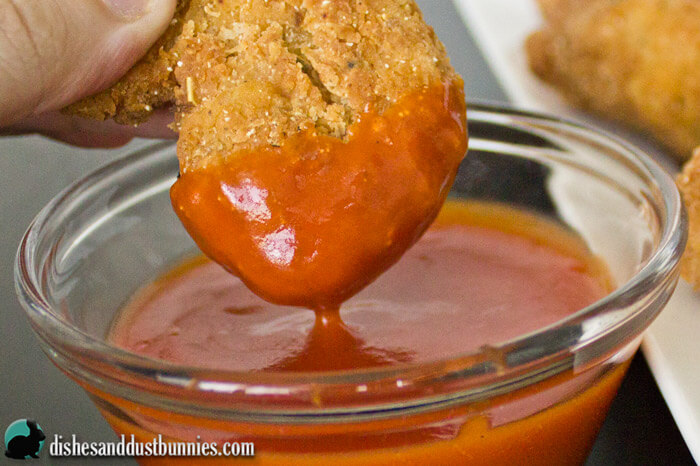
Finally, serve the crispy, golden shrimp with your favorite dipping sauce. Whether it's a tangy cocktail sauce, tartar sauce or a spicy buffalo, the choice is yours. Enjoy!
Alternative Cooking Methods
For best results and a wonderfully crispy coating, it's best to deep fry these shrimp in canola oil according to the instructions in the recipe card at the bottom of this post.
If you'd prefer, you could prepare these using other methods such as in an air fryer or baked in the oven. Below I share with you how to do it!
Baking Instructions: If you're looking to cut back on oil but still crave that crispy texture, baking is a fantastic option. Preheat your oven to 400°F (200°C), line a tray with parchment paper, arrange the battered shrimp on a baking sheet topped with a wire rack, spray the tops with a little cooking spray, then bake until golden brown (around 15-20 minutes). Remember to flip them halfway through for an even cook! The result? Deliciously crispy shrimp without the guilt of frying.
Air Fryer Instructions: Set the temperature to 375°F (190°C) and cook the shrimp for about 10-15 minutes, flipping them halfway through. Be sure to use cooking spray or brush the shrimp with a little oil before air frying to achieve that beautiful golden color.
Can Fried Shrimp be Prepared ahead of time?
Yes, fried shrimp can be prepared ahead of time!
For best results, I suggest preparing the shrimp according to the recipe and stopping after the chilling stage. You can either chill your battered shrimp in the refrigerator overnight or store them in the freezer. When it's time to serve, simply fry them as usual in your deep fryer. Enjoy the deliciousness!
It's always best to fry these fresh before serving.
Before you jump right in and make the recipe, there are a couple important things you should know so that these shrimp turn out just as awesome as the ones in the pictures. 🙂
Important Tips to make the Best Fried Shrimp Recipe EVER!
- Make sure to read the entire recipe before you start. While the recipe is not difficult, it's super important to know the exact steps you're going to take to get to the finish line.
- Have your ingredients assembled and ready to go before you start. This also goes the for tools used to make the recipe.
- When you are breading the shrimp, roll it repeatedly until NONE of the moist part of the batter is on the outside. This will create the perfect thick and crunchy breaded coating you need. When you think you're done coating that yummy little shrimp, keep rolling it in the breading a little more. 🙂
- Don't forget to chill the shrimp after you've coated them in the breading. This is an important step in making sure they turn out perfect.
- Closely watch the temperature of your frying oil! Depending on the temperature reading on the thermometer, you will need to adjust the heat throughout the cooking process.
Ok, so now that you have my tips to make sure these wonderful little things turn out exactly the way you want them, you might be wondering what's the best way to serve them.
Fried Crispy Shrimp Recipe Variations
Let's explore some exciting recipe variation ideas to add a touch of creativity to your fried shrimp!
- Spicy Kick: Add a fiery twist by incorporating some spices into your batter. Try mixing in cayenne pepper, or a dash of hot sauce for that extra kick. This variation will give your fried shrimp a tantalizing heat that will leave you craving more!
- Tropical Fusion: Consider adding shredded coconut to your batter or serving your fried shrimp with a side of pineapple salsa. This combination will transport you straight to a sunny beach paradise!
- Lemon Zest: Brighten up your fried shrimp by adding a burst of citrusy freshness. Simply grate some lemon zest into your batter or squeeze a little lemon juice over the cooked shrimp for a tangy zing. The refreshing hint of lemon will elevate the flavors and awaken your taste buds.
- Herb Infusion: Experiment with different herbs to create unique flavor profiles. Chop up some fresh parsley or cilantro and mix it into your batter for a vibrant and herbaceous twist. Alternatively, try using dill or basil for a fragrant and aromatic kick.
- Other Seasonings: If you'd like, you can also try adding other seasonings into the flour mixture in this recipe, such as garlic powder, onion powder, or even chili powder for a kick!
So, go ahead and get creative in the kitchen. Your taste buds will thank you for the explosion of flavors and exciting variations in your fried shrimp recipe. Enjoy the journey of discovering new and delicious combinations!
What kind of Oil is best for frying Shrimp?
When it comes to deep fried shrimp, the oil you use is crucial. Canola oil is highly recommended because of its high smoke point and neutral flavor. The high smoke point allows the oil to get hot enough to fry the shrimp to a crispy golden brown perfection without burning, while the neutral flavor doesn't interfere with the taste of the shrimp.
Furthermore, canola oil contains heart-healthy omega-3 fatty acids and is low in saturated fat, making it a healthier choice compared to other frying oils. However, other oils like peanut oil or vegetable oil can also be used if you don't have canola oil on hand.
How to prevent Fried Shrimp from becoming soggy? aka How to keep Fried shrimp crisp after cooking?
To prevent your fried shrimp from becoming soggy after frying, it's best to lay them on a wire rack over a metal baking sheet to drain any excess oil. I've found that laying fried foods directly on paper towels makes them absorb more oil and lose that wonderful crispiness we all enjoy.
Additionally, avoid overcrowding the shrimp in your deep fryer (or air fryer or baking sheet, depending on how you cook them). Crowding can cause the shrimp to steam instead of crisp up. Cook them in batches if necessary to ensure each shrimp cooks evenly and stays crispy.
What is the best shrimp to use for this recipe?
The best shrimp to use for this recipe are large raw shrimp that have been peeled and deveined. Fresh shrimp are always a great choice due to their superior flavor and texture. However, it is equally possible to use frozen shrimp, as long as they are properly thawed before cooking.
It's crucial to buy peeled and deveined shrimp for convenience, but if you only have access to shrimp that haven't been deveined yet, you can devein shrimp yourself with a bit of patience.
Whether you opt for fresh or frozen, remember that using raw shrimp is essential for this recipe to ensure the shrimp cooks evenly and absorbs all the delicious flavors of the batter.
How do I get breading to stick to my shrimp?
The secret to making sure that the breading sticks to the shrimp is to chill them in the fridge for at least 20 minutes after battering them. This will help the batter stick to the shrimp while frying.
Another tip is to make sure the shrimp are dry before breading them, as excess moisture can cause the breading to fall off while frying. Also, when breading the shrimp, be sure to roll it repeatedly until all of the moist part of the batter is on the inside and none on the outside. This will create a thick and crunchy coating that will stay put while frying.
How to Store and Reheat Leftover Fried Shrimp
For optimal enjoyment, it is recommended to consume freshly made fried shrimp while they are still deliciously crispy. However, fret not if you happen to have leftover shrimp! Below, you'll find some guidelines to help you enjoy your leftover fried shrimp another time!
When stored in the fridge, your leftover fried shrimp should stay fresh for about 3 to 4 days. It's always a good idea to store them in an airtight container or wrap them tightly in foil or plastic wrap to maintain their quality.
When stored in the freezer, they can last for up to 2 to 3 months. Just make sure to place them in a freezer-safe container or sealable bag to prevent freezer burn.
How to Reheat Fried Shrimp: To preserve their crispy exterior, it's best to reheat your fried shrimp in the oven rather than the microwave. Simply preheat your oven to around 350°F (175°C), place the shrimp on a baking sheet, and heat them for about 10 minutes or until they're warmed through, rejuvenated and crisp.
What to Serve with Crispy Fried Shrimp
When it comes to serving crispy fried shrimp, there's a whole world of delicious options to accompany this mouthwatering dish!
Imagine the ideal combination: delectably crispy fried shrimp paired with a mouthwatering baked calamari recipe crafted by the talented blogger, Kristin from Dizzy Busy & Hungry. Simply delightful!
Imagine the golden brown crunch of the fried shrimp alongside the tender and succulent baked calamari rings. It's a seafood lover's dream come true! The contrasting textures and flavors of these two dishes complement each other beautifully, making them a winning duo for any party appetizer menu.
To round out your spread, consider adding a few more delectable treats that will enhance the overall experience:
Complement your fried shrimp with a medley of delightful sides and dips. A fresh, vibrant garden salad gives a refreshing contrast to the rich shrimp. Zesty sauces like tangy tartar sauce, spicy mayo, buffalo sauce, or zingy cocktail sauce can elevate the shrimp to new flavor heights. Tartar sauce makes the perfect dip, but also don't forget the lemon wedges!
For a hearty touch, crispy french fries or potato wedges pair perfectly with the seafood. The salty crunch of fries or wedges complements the succulent shrimp beautifully.
Consider adding some grilled vegetables for a smoky flavor or a creamy coleslaw for a tangy twist. A side of garlic bread could offer a comforting, savory touch, while a bowl of fresh fruit provides a sweet finish. These additions will create a well-rounded, satisfying meal that showcases the versatility of fried shrimp.
The Best Crispy Fried Shrimp Recipe
- Total Time: 1 hour
- Yield: 25 – 30 Shrimp 1x
Description
Dive into our absolutely delicious crispy fried shrimp recipe! Learn the secrets to the best shrimp batter for incredibly crunchy, breaded shrimp that's restaurant-quality from the comfort of your own home. This delicious recipe will guide you through each step, ensuring your fried shrimp turns out perfectly crispy every time.
Ingredients
- 25 – 30 raw Jumbo shrimp, peeled and de-veined, tails removed (I use the frozen kind and just thaw beforehand)
- Canola oil – enough to fill a deep pot 2-3 inches high (or you can use a deep fryer)
- Your favorite dipping sauce for serving (buffalo, tartar sauce, cocktail sauce, etc)
Batter Ingredients:
- 4 eggs
- 1 ½ cups all purpose flour
- 1 tbsp salt
- 1 tbsp baking powder
- 1 tsp white pepper or ¼ tsp of black pepper
- 1 ½ cups milk
Breading:
- 2 cups all purpose flour
- ¼ cup cornmeal
- ½ tsp oregano
- Pinch of ground powdered ginger
- 1 crushed bay leaf
- pinch of black pepper
- pinch of crushed celery seed
- ⅛ tsp mustard powder
- 1 tbsp smoked paprika
- 1 ½ tsp Cajun seasoning
- 2 tsp salt
- ⅓ cup + 2 tbsps Panko bread crumbs
Items Needed In addition to typical tools:
- Deep Fryer OR large pot with high sides for frying on the stove
- If using a large pot, you'll also need:
- Wire/mesh strainer scoop, slotted spoon or tongs to fish out your shrimp from the fryer once cooked
- wire rack that fit on a baking sheet
- Baking sheets (make sure they can also fit inside your fridge)

Instructions
Batter the Shrimp
- Preheat the oven to 200°F.
- Combine the Batter ingredients in a medium mixing bowl. Use a whisk to make sure everything is combined well.
- In a separate large mixing bowl, combine all the dry ingredients for the breading.
- Place a wire rack onto a baking sheet. This is where you will lay your shrimp as they are breaded.
- Working with 1 shrimp at a time – dip the shrimp into the breading to coat, then dip into the batter and allow the excess to drip off.
- Next, drop the shrimp into the breading again. Roll the shrimp back and forth until thickly coated in the batter. You’ll know it has enough breading when the shrimp is completely coated, and the moist parts of the batter are no longer on the outside. Every bit of the moist batter part should be coated in the breading.
- As you batter the shrimp, place them on a baking sheet lined with parchment paper. Once all the shrimp have been battered, place the baking sheet lined with parchment paper in the fridge to chill for 20 minutes. It’s important that the shrimp chill before frying to set the batter and breading properly – this will prevent the batter from falling off when you fry them.
Fry the Shrimp
- While the shrimp chill in the fridge, heat your oil in a deep pot on the stove – about 2-3 inches of oil. Make sure that the thermometer is attached to the side. You can also use a deep fryer for this – preheat it to 365°F.
- Place the other baking sheet (wire rack on top) inside the preheated oven. This is where you will place the shrimp to keep warm and crisp while you fry.
- Once the oil for frying has heated to 360° – 365°F, you can begin frying the shrimp. Try not to let the oil smoke, or your shrimp will burn. Keep a close eye on the thermometer and adjust the heat as you fry to maintain the proper temperature. Something to keep in mind – a deep fryer will help maintain a constant temperature better than a pot of oil on the stove, so if you don't yet have one, please consider getting one!
- Fry 6 – 8 shrimp at a time. Do not crowd them. Fry for 3 – 4 minutes each side. Flip only once.
- As the shrimp are cooked, use a metal mesh strainer to fish each of the shrimp out of the oil and place them into the warm oven on the wire rack. Repeat the frying process until all shrimp have been cooked and are warmed in the oven.
Serve right away with your favorite dipping sauce. We love to use homemade buffalo sauce as a dip for these, but they're also great served with Burger King copycat zesty onion ring sauce, tartar sauce, or cocktail sauce.
Alternate Cooking Methods
For best results and a wonderfully crispy coating, it's best to fry these shrimp in oil according to the instructions above. If you'd prefer, you could prepare these using other methods such as in an air fryer or baked in the oven. Below, I share with you how to do it!
Baking Instructions: If you're looking to cut back on oil but still crave that crispy texture, baking is a fantastic option. Preheat your oven to 400°F (200°C), line a tray with parchment paper, arrange the battered shrimp on a baking sheet topped with a wire rack, spray the tops with a little cooking spray, then bake until golden brown (around 15-20 minutes). Remember to flip them halfway through for an even cook!
Air Fryer Instructions: Set the temperature to 375°F (190°C) and cook the shrimp for about 10-15 minutes, flipping them halfway through. Be sure to use cooking spray or brush the shrimp with a little oil before air frying to achieve that beautiful golden color.
- Prep Time: 25 mins
- Cook Time: 35 mins
- Category: Appetizer
- Method: Frying
- Cuisine: Comfort Food