
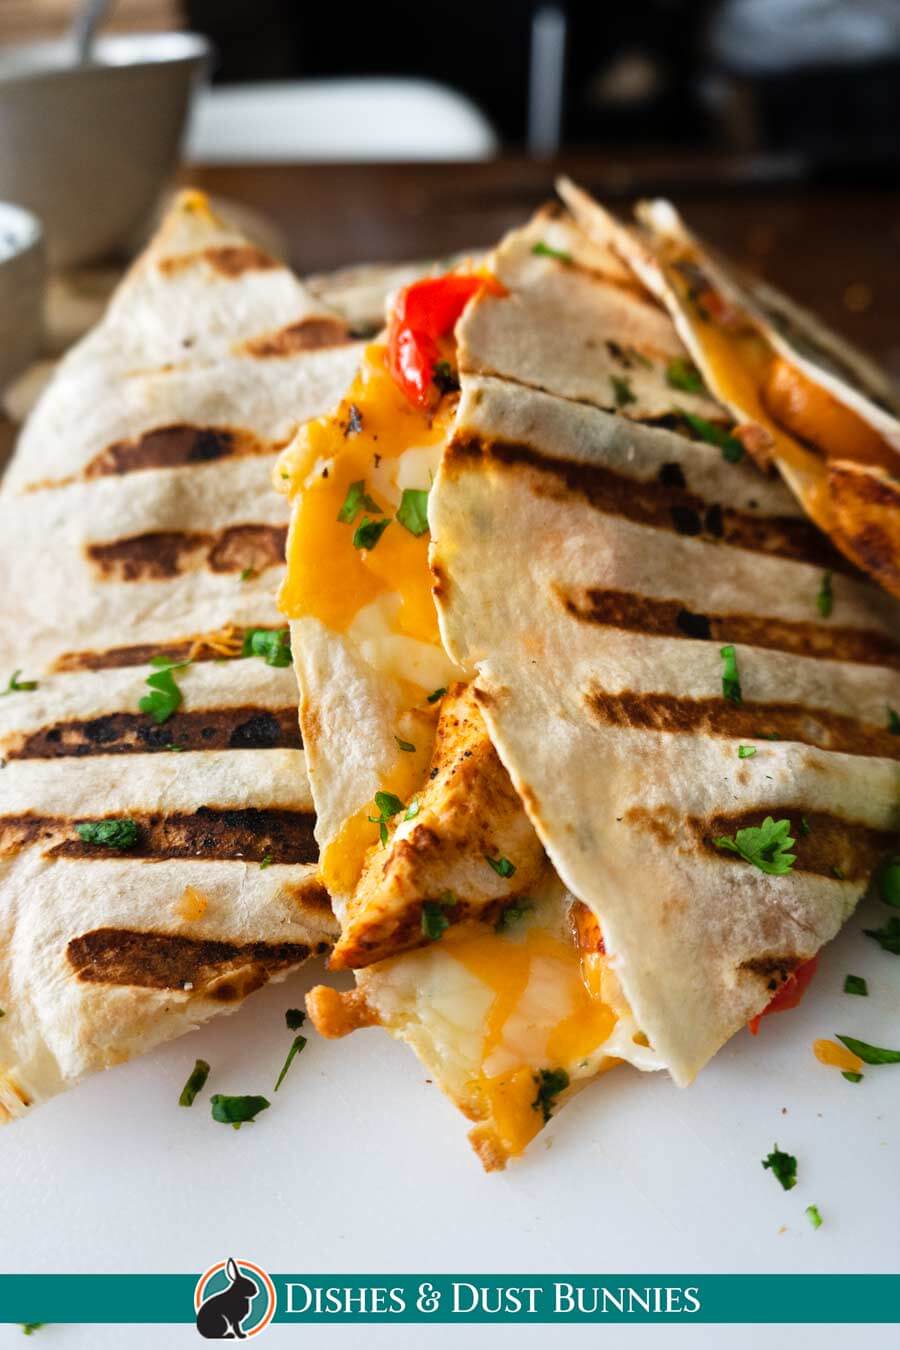
Easy Chicken Quesadillas
I love quesadillas! Best of all, these easy chicken quesadillas will help you make the most of your time in the kitchen. With just a few simple ingredients, you can have a delicious and satisfying homemade meal that everyone will enjoy. Perfect for a weeknight dinner the whole family loves when you're busy and want to make something yummy fast. Try this staple Tex Mex recipe tonight!
I hope you enjoy this recipe! ❤️ If you give it a try, please let me know how it turned out for you in the comments section at the bottom of the page or share a pic of your om noms on Instagram and tag @dishesanddustbunnies! ❤️
What can you put in a quesadilla?
Really, the sky’s the limit when it comes to filling these delicious cheesy om-nom-filled tortillas!
For this recipe, I used sliced, grilled chicken breast, but you can't go wrong with shredded chicken along with its irresistible layers of melty shredded cheese! You could easily add in some sautéed veggies such as slices of red bell peppers with onions.
Popular veggies found in quesadillas are
- sliced red peppers
- sliced green bell pepper
- chopped cilantro
- Green onions
- Mix of peppers and onions
To add a little more protein, you could also try adding refried beans or swap the chicken out for shredded pork or ground beef. The possibilities are part of the fun of making a quesadilla!
While I don't personally put them in myself, refried beans can be spread on the tortilla prior to putting in the cheese. Black beans can then be sprinkled in.
The grilled chicken breasts in this recipe were flavored with taco seasoning, but you can also try using these popular options as a seasoning:
- a simple seasoning mix of salt and pepper, cumin, and chili powder
- fajita seasoning
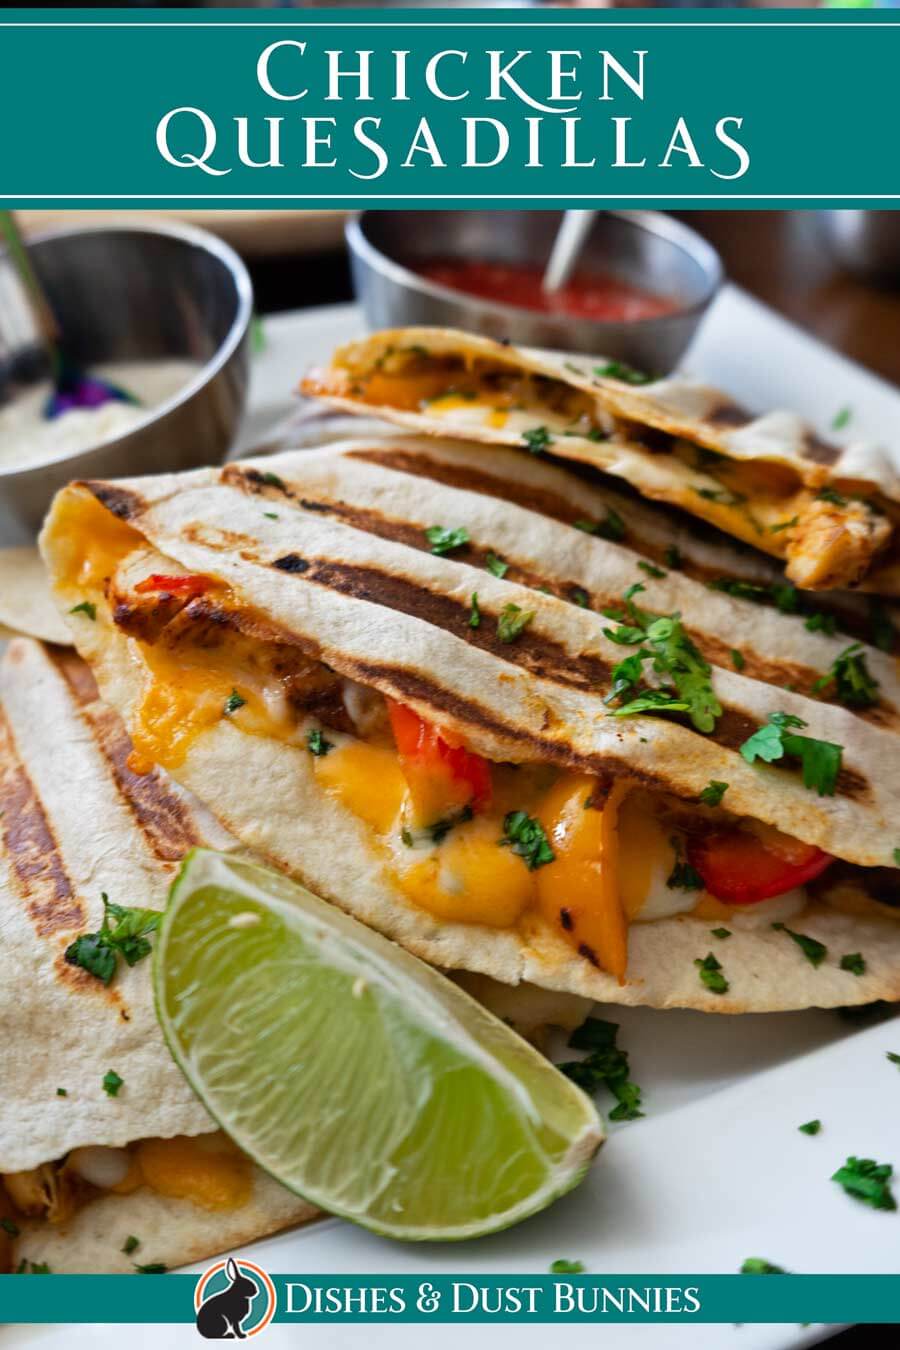
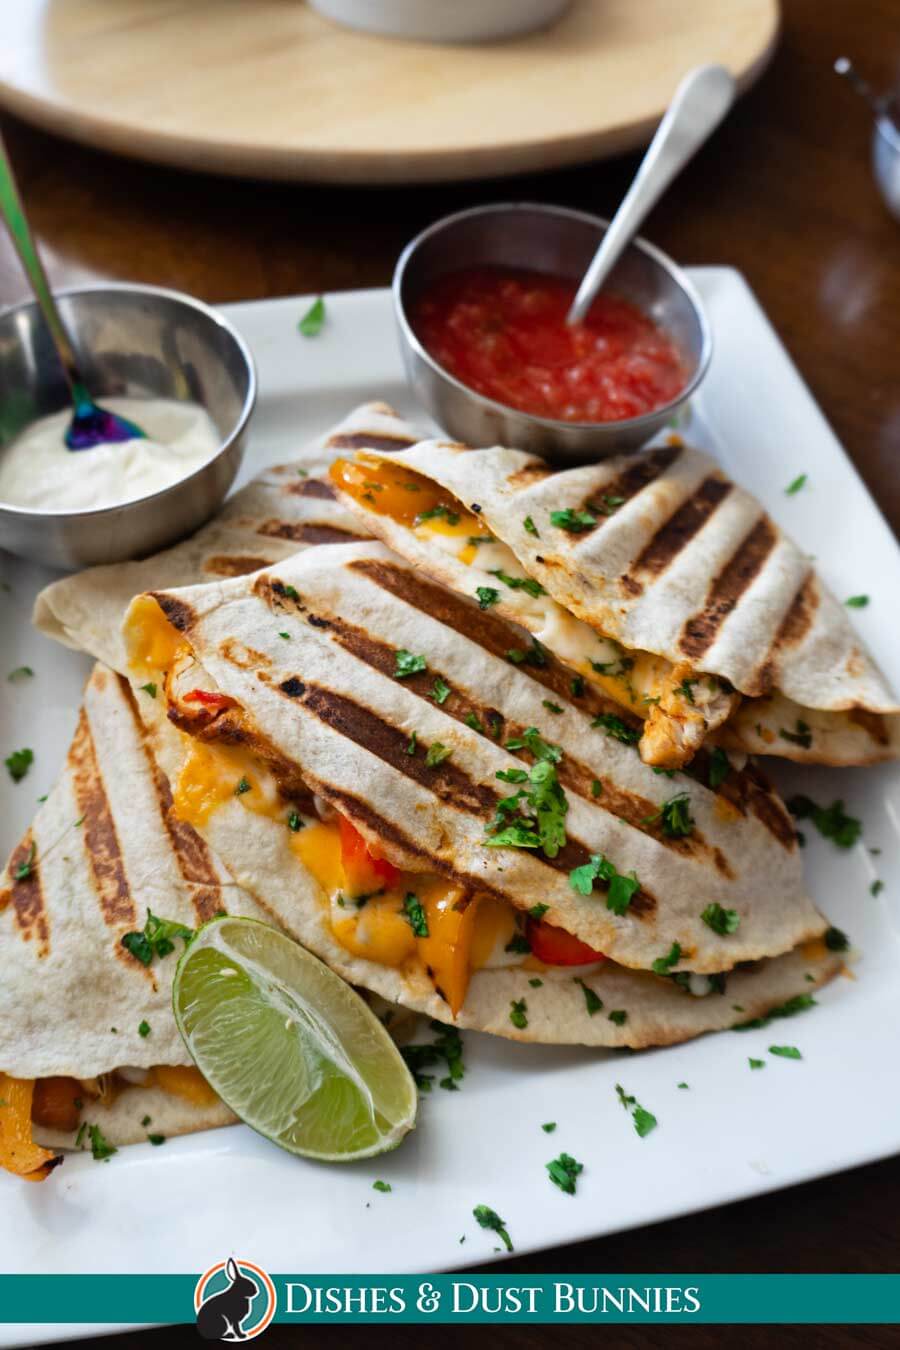
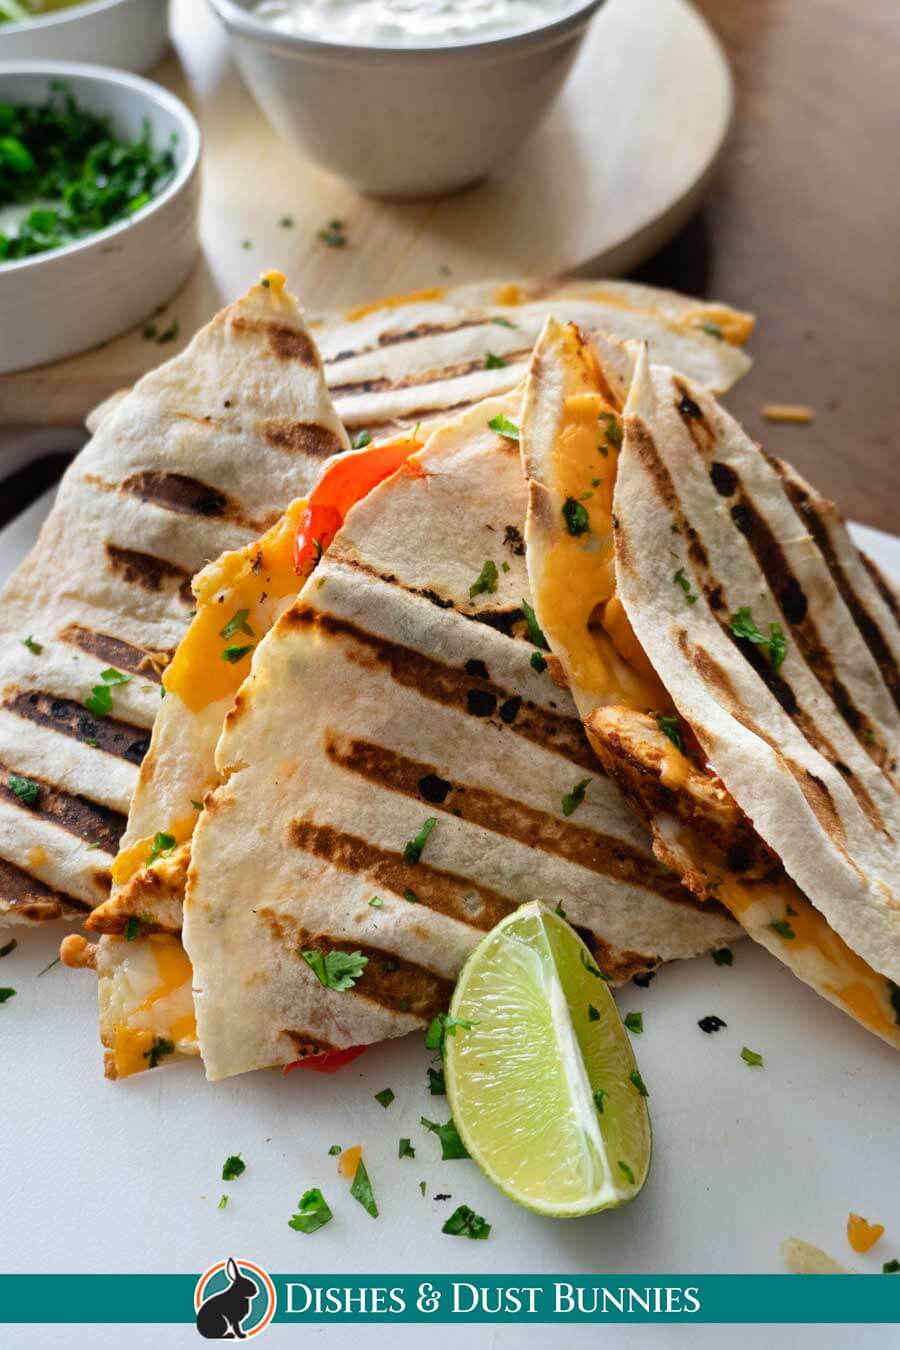
Don't forget to serve with sour cream, which leaves a nice, mild tang. A squirt of lime on your quesadilla makes for the perfect finishing touch!
Be sure to see the recipe card at the bottom of the post for full ingredients & instructions!
How to make Chicken Quesadillas – Overview
The Best Chicken Quesadilla Recipe
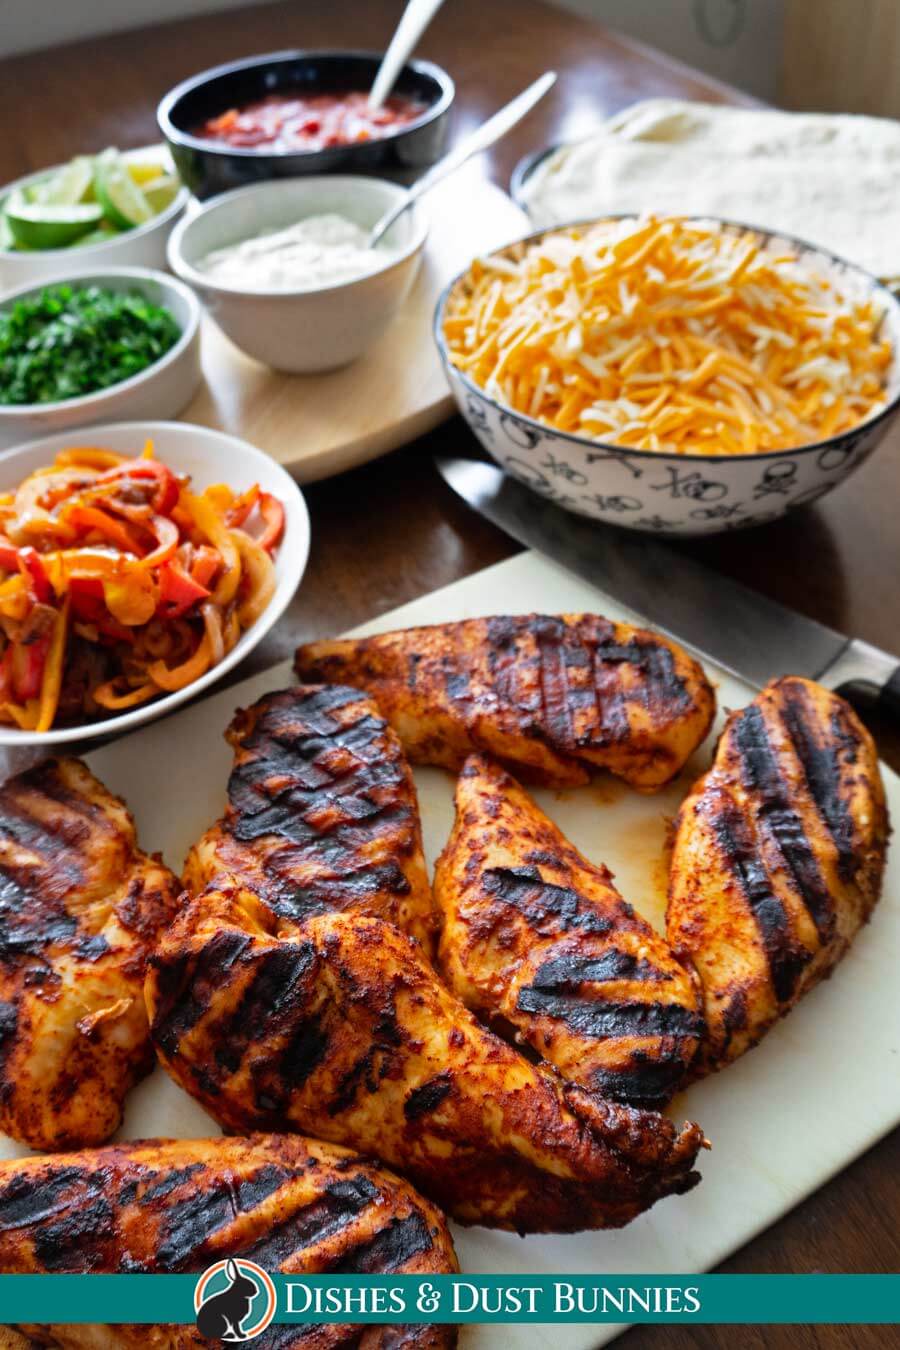
Prepare your Ingredients: Have all your ingredients laid out and ready in order to assemble your quesadillas easily. Have your tortillas, cheese, chopped cilantro, cooked chicken filling, and cooked peppers laid out and ready.
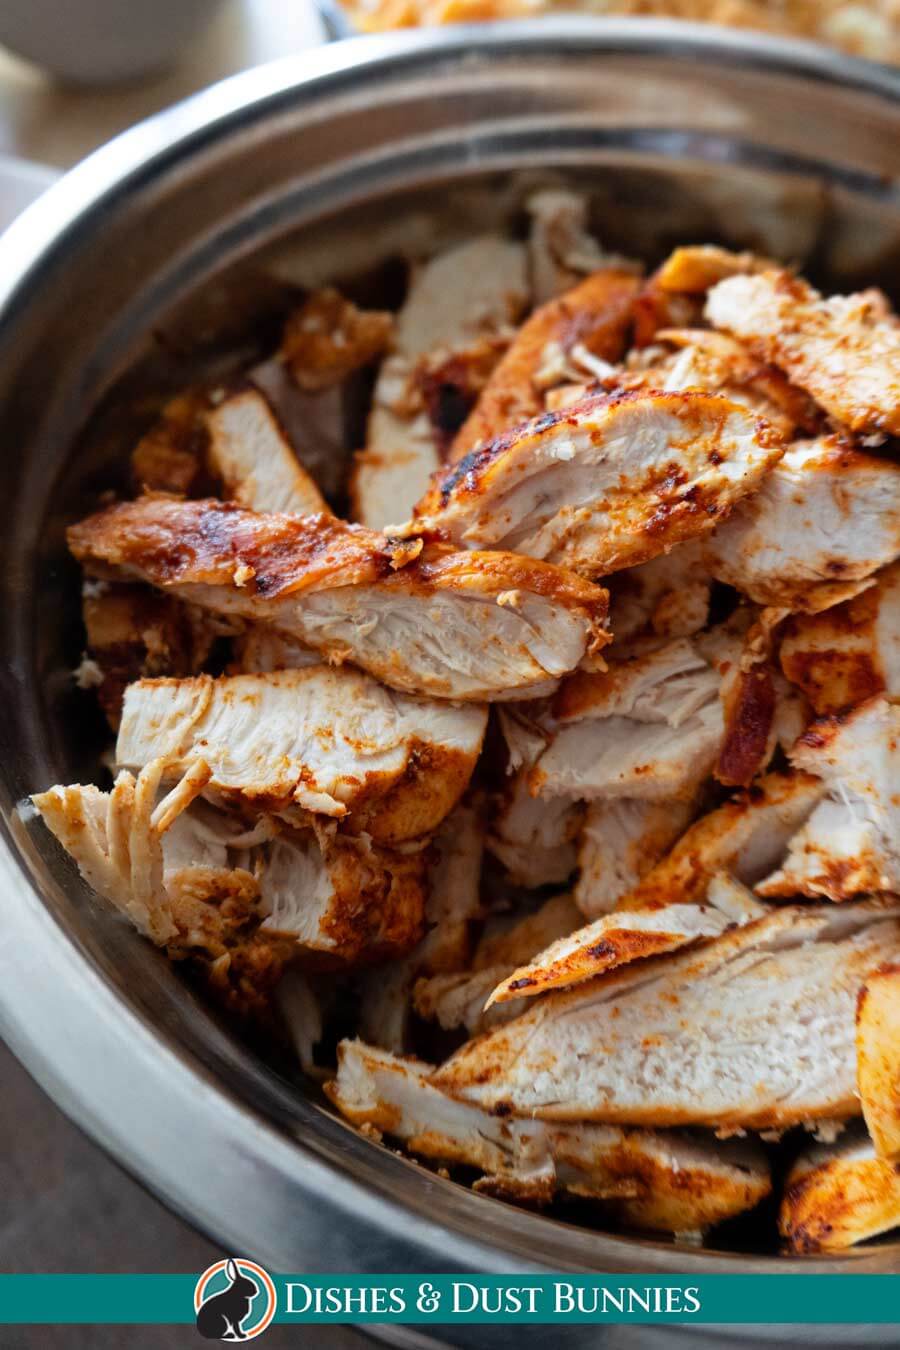
Cook your chicken/meat: This is the first thing you need to do when making homemade quesadillas. I like to grill chicken breasts that have been sprinkled with taco seasoning, then once they've cooled for a few minutes after cooking, I thinly slice them and set them aside until I'm ready to assemble the quesadillas.
Cook the Veggies: In a large pan or skillet, I cook sliced bell peppers (red, orange and green are all great!) along with some thinly sliced onions in a little oil. Once they're almost finished cooking, I add about ½ cup of prepared salsa and cook for a few more minutes. Set aside until you're ready to assemble the quesadillas.
How to Assemble a Quesadilla:
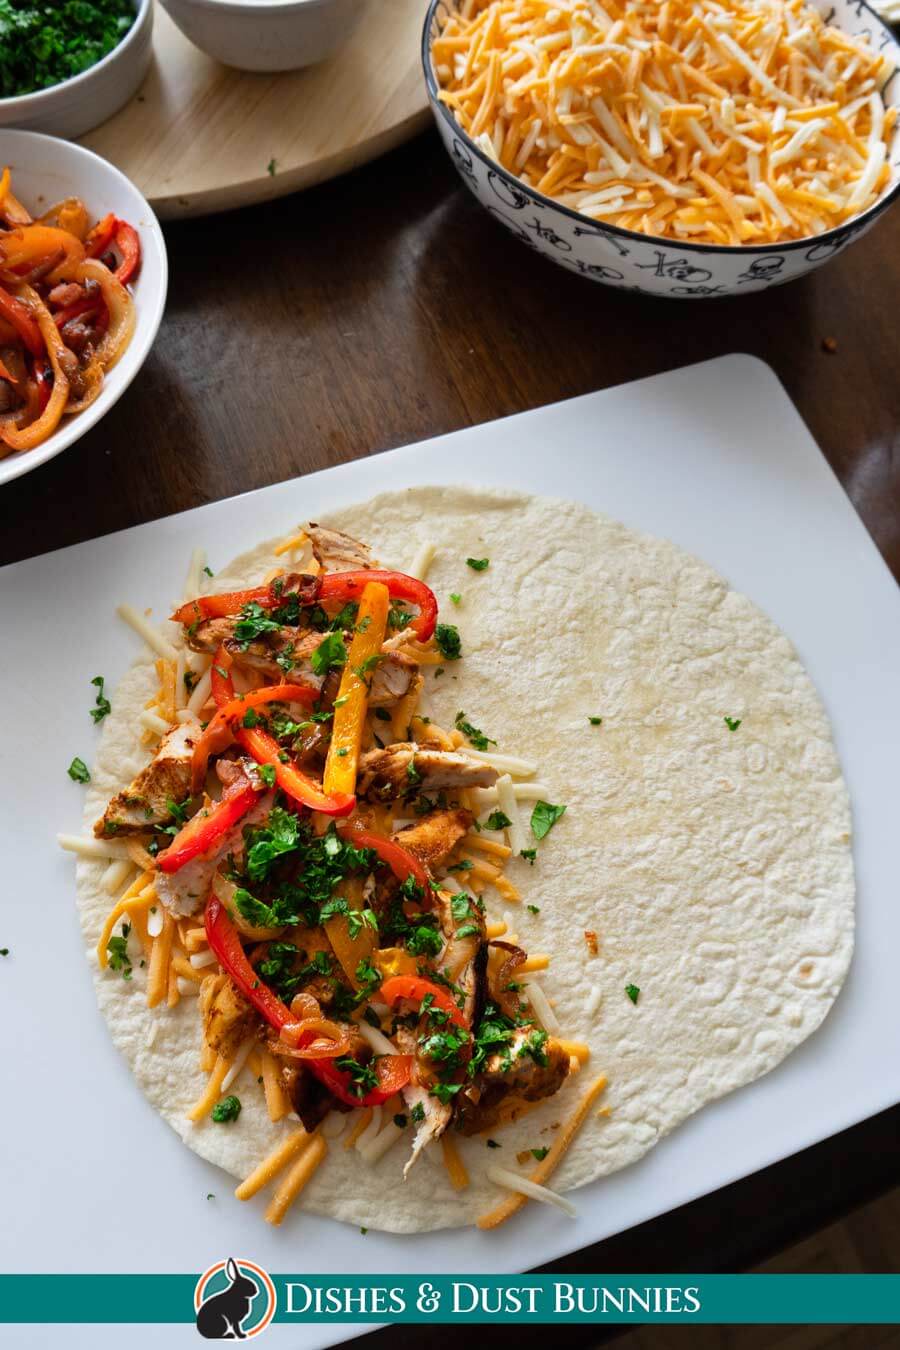
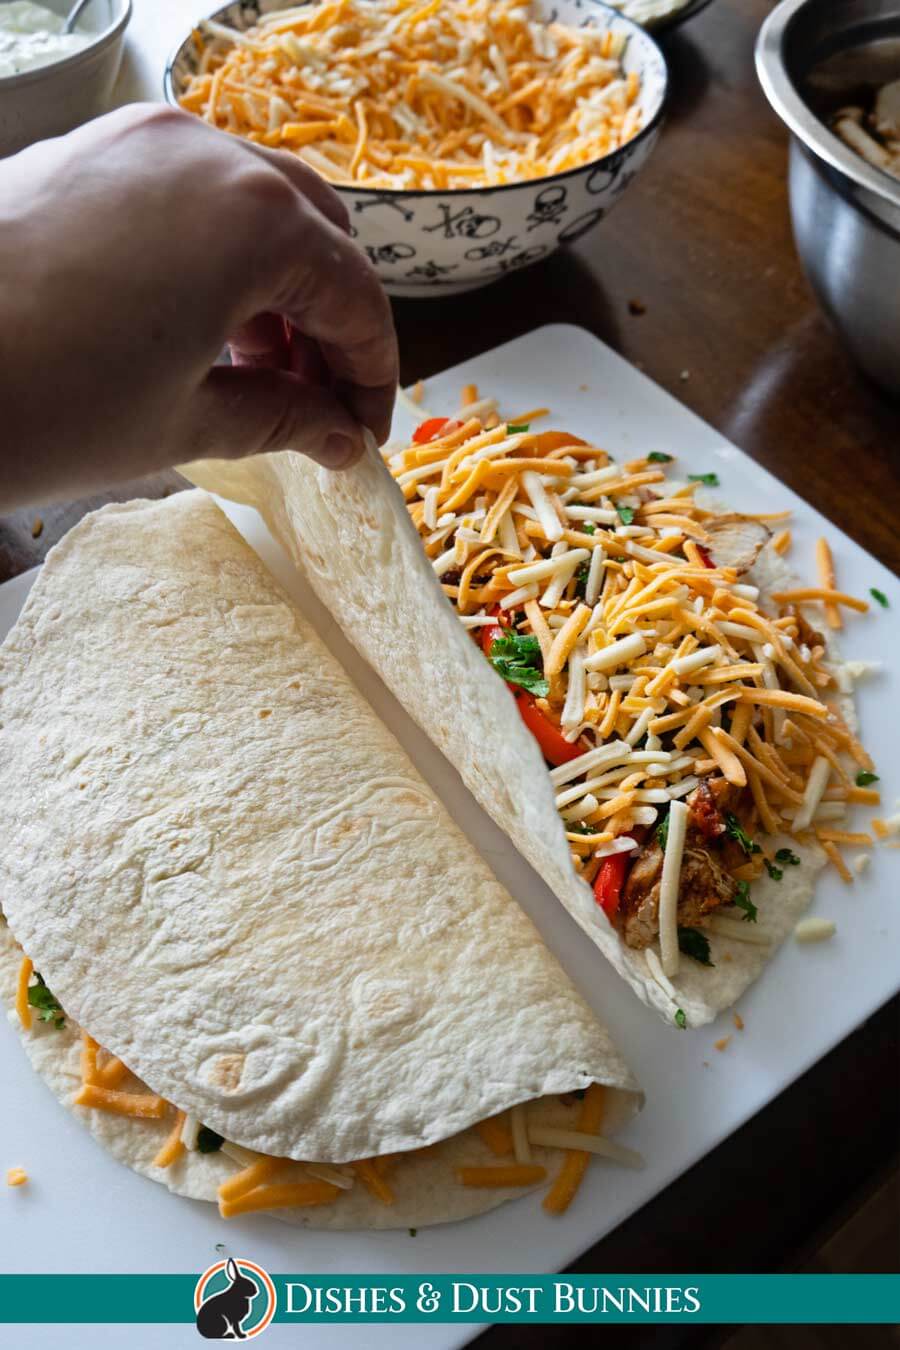
Be sure to have your ingredients set out and ready to go – cooked chicken, cooked peppers and onions, chopped cilantro, cheese, and tortillas.
Sprinkle cheese on half of the tortilla circle. On top of this, add strips of the grilled chicken, then lay some cooked pepper and onion slices on top. Next, sprinkle some chopped cilantro, then add some cheese on top.
Fold the empty side of the tortilla over the side with the fillings.
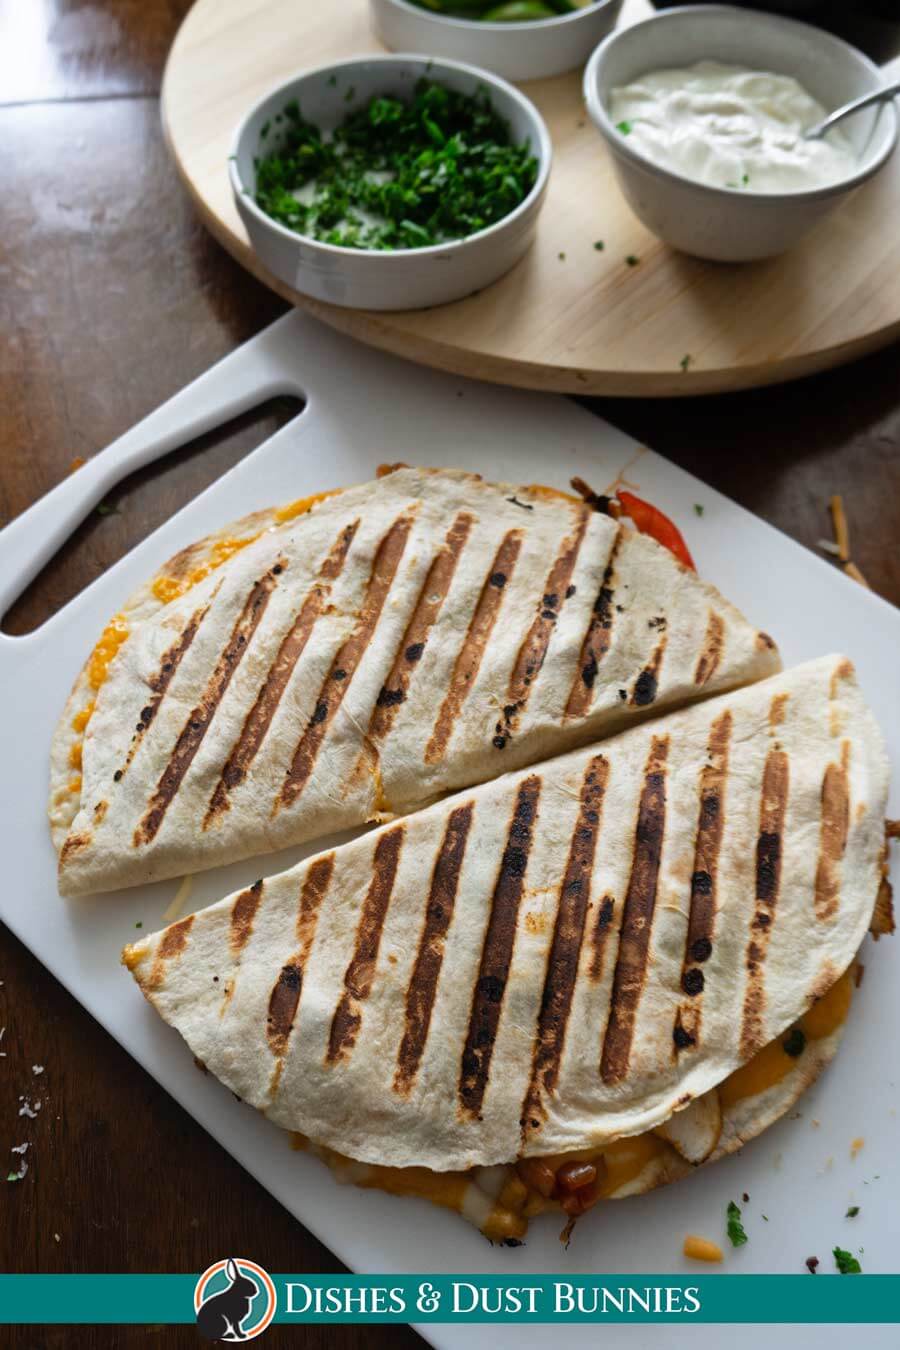
Brush the top of the quesadilla with melted butter, then cook in a panini press, large skillet or in the oven. Be sure to brush some melted butter on the surface of your skillet or whatever you're using to cook the quesadilla with.
Continue these steps with the remaining tortillas until you use up all your ingredients. Serve immediately with a side of sour cream, salsa and lime wedges.
Be sure to see the recipe card at the bottom of the post for full ingredients & instructions!
Are quesadillas better with oil or butter?
There are many schools of thought when it comes to cooking quesadillas. Some people prefer to use oil, while others believe that butter is the way to go. So, which is better?
If you're looking for a healthier option, then cooking with oil is probably the better choice. However, if you're looking for a richer flavor, then using butter may be the way to go.
Ultimately, it comes down to personal preference. If you're not sure which method you prefer, then why not try both and see for yourself? After all, there's no wrong way to make a quesadilla!
How do I make crispy quesadillas?
You can bake or fry your quesadillas. But frying them in a pan or cooking them in a panini press will give you the crispiest results.
You can control how crispy the quesadillas get based on how long you cook them – the more time you cook them, the crispier the result! But be sure to watch closely so you don't burn them!
As a general rule, you should cook your quesadillas for about 2-3 minutes per side but if you want them extra crispy you can cook them a little longer than that.
If you are using flour tortillas, you can either fry them or bake them. If you decide to use corn tortillas, frying them is by far the best way to go.
Another tip for making crispy quesadillas is to not overfill them. When you add too much filling, it makes it difficult to get a nice crisp on the outside. So, add just enough filling to cover the bottom of the tortilla, but not so much that it’s overflowing.
Finally, don’t forget to brush the outside of the tortillas with a little bit of olive oil or butter before cooking. This will help them to get nice and crispy.
What is the best cheese for quesadillas?
There are so many different types of cheese out there, so it can be tough to choose the right one for your quesadillas.
- If you're looking for a sharp flavor, then cheddar cheese is a good option.
- For a more mellow flavor, try using shredded Monterey Jack cheese.
- For something in between sharp and mellow you can go for a Pepper jack cheese.
- Oaxaca cheese is a type of Mexican cheese named after the state of Oaxaca. It is a white, semi-soft cheese that has a mild and slightly salty flavor. Very popular with quesadillas.
- Mix things up by combining the aforementioned cheeses.
Don't forget: the right cheese for a quesadilla is shredded cheese fresh from the block! Beyond that, it all comes down to personal preference.
Freshly shredded cheese off the block is best since the pre-shredded store bought kind has extra ingredients which will give you less melty results. The shredded cheese is the glue that holds this delicious cheesy thing together!
You may have to experiment with less or more cheese till you find the perfect melted cheese mix for your taste buds!
How do you make a quesadilla that doesn't fall apart?
It's all about the tortilla!
Using a flour tortilla instead of a corn tortilla is your best option for making a quesadilla that doesn't fall apart. Focus on choosing a soft, pliable flour tortilla (wheat or white). Corn tortillas are a bit more brittle than a flour tortilla and may crack when you fold them so they can only handle smaller amounts of filling before they fall apart.
No matter what you do, making sure you don't overfill the tortilla is crucial. It is always better to use your filling on making more quesadillas rather than overfilling a few super large quesadillas.
The final tip is to first layer cheese on the bottom of the tortilla, then fill the tortilla with filling, after that sprinkle more cheese on top and fold the tortilla in half. Both the top and bottom of the tortilla should be lined with cheese to help hold everything together.
What are the best tortillas for quesadillas?
The best tortillas for quesadillas are the ones that are soft and pliable. You don't want a tortilla that is too crunchy, or else your quesadilla will fall apart. For this reason, flour tortillas are better for achieving that soft quesadilla texture as opposed to corn tortillas, which are better for making crispy, crunchy tacos.
Corn tortillas do have the benefit of being gluten-free (unlike flour tortillas), but altogether the flour tortilla is the natural fit for what the soft, not brittle quesadilla is going for.
How to Keep Quesadillas from Getting Soggy
When it comes to quesadillas, there are a few things that can make or break them. One of those things is ensuring that they don't end up soggy.
There are a few things that you can do to prevent this from happening. One is to use a good quality flour tortilla. Another is to not overload your quesadilla with too much filling.
And finally, one of the best things that you can do is to cook your quesadilla on a preheated skillet or in a panini press if you have one. This will help to crisp up the outside of the quesadilla and keep the inside nice and flavorful.
Quesadilla Cooking Methods
I personally make quesadillas in a panini press since it is the easiest way. The panini press cooks both sides simultaneously so you are not required to carefully flip the quesadillas.
On a Panini press or “George Foreman” style Grill:
Preheat the panini press. Brush the bottom with butter. Place assembled quesadilla in the bottom of the press. Close the lid of the press and cook for 2 to 3 minutes or until the tortillas are golden brown and the cheese is melted.
On the stove:
Heat a large skillet with butter, over medium heat. Place one prepared quesadilla in the skillet. Cook for 2 to 3 minutes per side or until the tortillas are golden brown and the cheese is melted. Be careful when flipping it to the other side!
In the oven:
Preheat oven to 375°F. Spray a baking sheet with cooking spray or brush with butter. Place the quesadillas on the baking sheet. Bake for 10 to 12 minutes or until the tortillas are golden brown and the cheese is melted.
Be sure to see the recipe card at the bottom of the post for full ingredients & instructions!
Quesadilla Recipe Variations
Now that you know how to make a basic chicken quesadilla, it's time to get creative with some recipe variations:
Meat: For this recipe, I usually prefer to use sliced grilled chicken, but you can try using other kinds of meats if you like. You could easily substitute grilled chicken for shredded chicken, leftover rotisserie chicken, pulled pork, ground beef, strips of steak, etc.
Seasonings: To make things simple, for this recipe I used taco seasoning, but you can use other spice mixtures such as store bought quesadilla seasoning, or even fajita seasoning. You could even keep things simple by seasoning your chicken/meat with chili powder, cumin, some salt and pepper.
Veggies: For this quesadilla recipe I used slices of red and yellow peppers with onions, but you could also try adding in other veggies such as mushrooms, zucchini, or even spinach!
Here are some other AMAZING flavor combinations you'll enjoy!
- Tropical: Add some chopped pineapple, mango and papaya to your quesadillas for a taste of the tropics.
- Greek: Give your quesadillas a Mediterranean twist! First remove the salsa and replace with jarred sun-dried tomatoes packed in oil (make sure to chop them up), then add feta cheese to whatever other cheese you are already using, toss in some kalamata olives too.
- BBQ Chicken: Swap out the salsa for your favorite BBQ sauce for a different flavor. Once you do that, make sure to use shredded cheddar cheese as your primary cheese since cheddar goes well with BBQ sauce.
- Basil Pesto: Spread some pesto on your tortillas before adding the chicken and cheese for a fresh basil-packed dish.
- Extra Spicy Quesadillas: Add some diced jalapeños or habaneros to your traditional bell peppers to spice things up.
- Southwestern: Mix things up by using whole wheat tortillas and adding black beans, corn and avocado to your quesadillas.
Be sure to see the recipe card at the bottom of the post for full ingredients & instructions!
Can I make Chicken Quesadillas ahead of time?
Yes! One of the benefits of making quesadillas is that you can save time by using chicken that's been cooked, sliced and prepared ahead of time.
When you're ready to assemble your quesadillas, just take the cooked chicken from the fridge or freezer and add them! If you've had your chicken in the freezer, be sure to allow it to thaw in the fridge overnight.
The quesadillas themselves can be assembled ahead of time a couple hours before serving and kept in the fridge.
What to Serve with Chicken Quesadillas
A quesadilla is stuffed with so much savory spiced meat and fresh veggie goodness that it's already a full meal in and of itself. But there are lots of sides you can dip or drizzle onto your quesadilla to give contrasting flavors making your ingredients harmoniously dance together. These sides are key to make your quesadilla snacking experience really pop:
- Sour cream or plain yogurt (Personally I wouldn't even think of having a quesadilla without this)
- Pico de gallo
- Pineapple Salsa. The sweetness and juiciness of the pineapple pairs perfectly with the savory flavors of the chicken and spices.
- Mango salsa. Easy to make: just chop up some mango, red onion, cilantro and jalapeno (if you like a little heat with the sweet).
- Guacamole or avocado slices
- Shredded lettuce or chopped tomatoes
- Hot sauce or BBQ sauce
- Lime (Squirt the lime juice on top for the finishing touch)
Be sure to see the recipe card at the bottom of the post for full ingredients & instructions!
Leftovers – How to Store and Reheat
Here are some tips on how to store and reheat your remaining quesadillas so they taste just as good as when you first made them.
First, if you have any chicken quesadillas that are completely cooled, wrap them tightly in plastic wrap or aluminum foil. If they're still warm, then place them on a plate and cover with a clean kitchen towel until they're cool enough to wrap up. Once they're wrapped up, place them in the fridge for up to four days.
When you're ready to reheat your chicken quesadillas, preheat your oven to 350°F. Then, unwrap the quesadilla and place it on a baking sheet. Bake for 10-12 minutes, or until the tortilla is crispy and the cheese is melted. You can also reheat your quesadillas from frozen in this way but keep in mind, you may have to bake them for a little longer.
You can also reheat your quesadillas in the microwave, but be careful not to overcook them. Place the quesadilla on a plate and heat for 30-60 seconds, or until the tortilla is crispy and the cheese is melted.
Can I freeze Chicken Quesadillas?
You can absolutely freeze chicken quesadillas! I like to individually wrap them in foil, then place them all in a freezer bag. When you're ready to eat, simply remove from the freezer and reheat in the oven or microwave.
How long are Chicken Quesadillas good for?
When stored properly in an air tight container or zip lock baggie, prepared chicken quesadillas will last in the fridge for 3-4 days or in the freezer for up to 2 months.

Chicken Quesadillas
- Total Time: 35 minutes
Ingredients
The amounts of ingredients in this recipe are up to you! When I make quesadillas, I don't usually use specific amounts – this makes it great for using up leftovers too!
Veggie Ingredients
- Sliced peppers (red are best, but orange and green are nice too)
- Sliced onions
- about ½ cup or more of salsa
Chicken/Meat/Protein Ingredients:
- 6–8 chicken breasts (amount is up to you!)
OR other meat/protein of your choice - taco seasoning
- a little cooking oil
Other Ingredients
- flour tortillas
- shredded cheese – a combination of sharp cheddar and pepper jack is nice but you can use whatever you like)
- Chopped cilantro
For Serving
- sour cream
- salsa
- lime wedges

Instructions
Prepare your Ingredients
Once all your ingredients have been prepared, lay out so you're ready to assemble your quesadillas easily. Have your tortillas, cheese, chopped cilantro, cooked chicken filling, and cooked peppers lead out and ready.
- Cook your chicken/meat: This is the first thing you need to do when making homemade quesadillas. I like to grill chicken breasts that have been sprinkled with taco seasoning, then once they've cooled for a few minutes after cooking, I thinly slice them and set them aside until I'm ready to assemble the quesadillas.
- Cook the Veggies: In a large pan or skillet, I cook sliced bell peppers (red, orange and green are all great!) along with some thinly sliced onions in a little oil. Once they're almost finished cooking, I add about ½ cup of prepared salsa and cook for a few more minutes. Set aside until you're ready to assemble the quesadillas.
How to Assemble a Quesadilla:
- Be sure to have your ingredients set out and ready to go – cooked chicken, cooked peppers and onions, chopped cilantro, cheese, and tortillas.
- Sprinkle cheese on half of the tortilla circle. On top of this, add strips of the grilled chicken, then lay some cooked pepper and onion slices on top. Next, sprinkle some chopped cilantro, then add some cheese on top.
- Fold the empty side of the tortilla over the side with the fillings.
- Brush the top of the quesadilla with melted butter, then cook in a panini press, large skillet or in the oven. Be sure to brush some melted butter on the surface of your skillet or whatever you're using to cook the quesadilla.
- Continue these steps with the remaining tortillas until you use up all your ingredients.
How to Serve Quesadillas
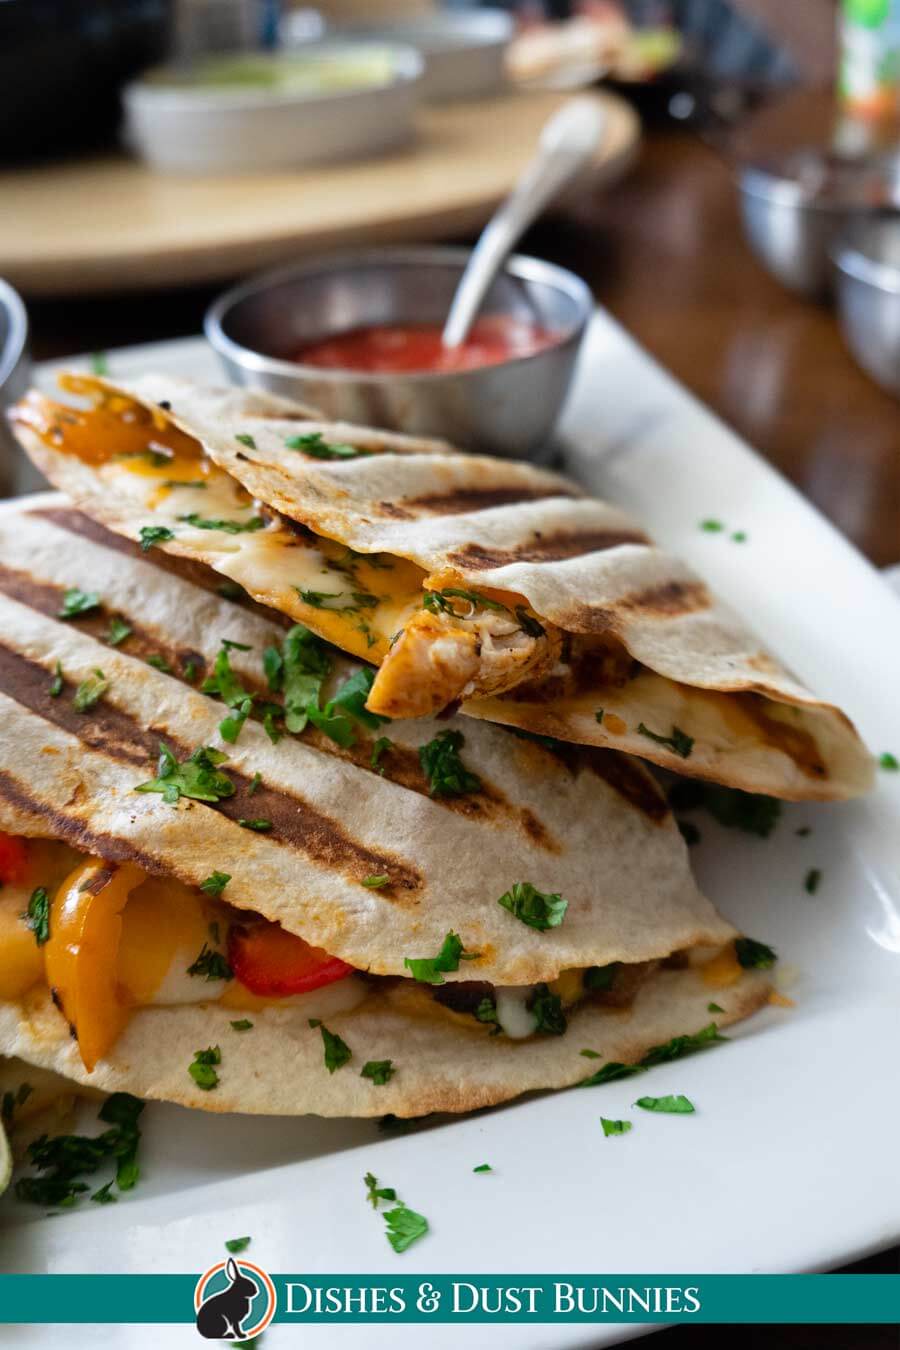
- Before serving, allow the quesadilla to cool down a bit – about 5 minutes – this will make it easier to cut and help prevent the filling from slipping out. Cut each folded and cooked quesadilla in half so you have 2 triangles. I typically serve 4 triangles per person.
- Serve along with a small bowl of salsa and small bowl of sour cream for each person. Place a lime wedge on the plate.
- TIP: The lime juice adds a wonderful flavor to the quesadillas! I like to squeeze a bit of lime over top of my quesadillas as I devour them – or you could squeeze some into your salsa!
Alternate Instructions
I personally make quesadillas in a panini press since it is the easiest way, but you're welcome to also make them in pan on the stove or even in the oven if you like!
On the stove:
Heat a large skillet with butter, over medium heat. Place one prepared quesadilla in the skillet. Cook for 2 to 3 minutes per side or until the tortillas are golden brown and the cheese is melted. Be careful when flipping it to the other side!
In the oven:
Preheat oven to 375°F. Spray a baking sheet with cooking spray or brush with butter. Place the quesadillas on the baking sheet. Bake for 10 to 12 minutes or until the tortillas are golden brown and the cheese is melted.
- Prep Time: 20 minutes
- Cook Time: 15 minutes
- Category: Main
- Method: Panini Press/Skillet/Oven
- Cuisine: Tex Mex – Mexican Inspired