
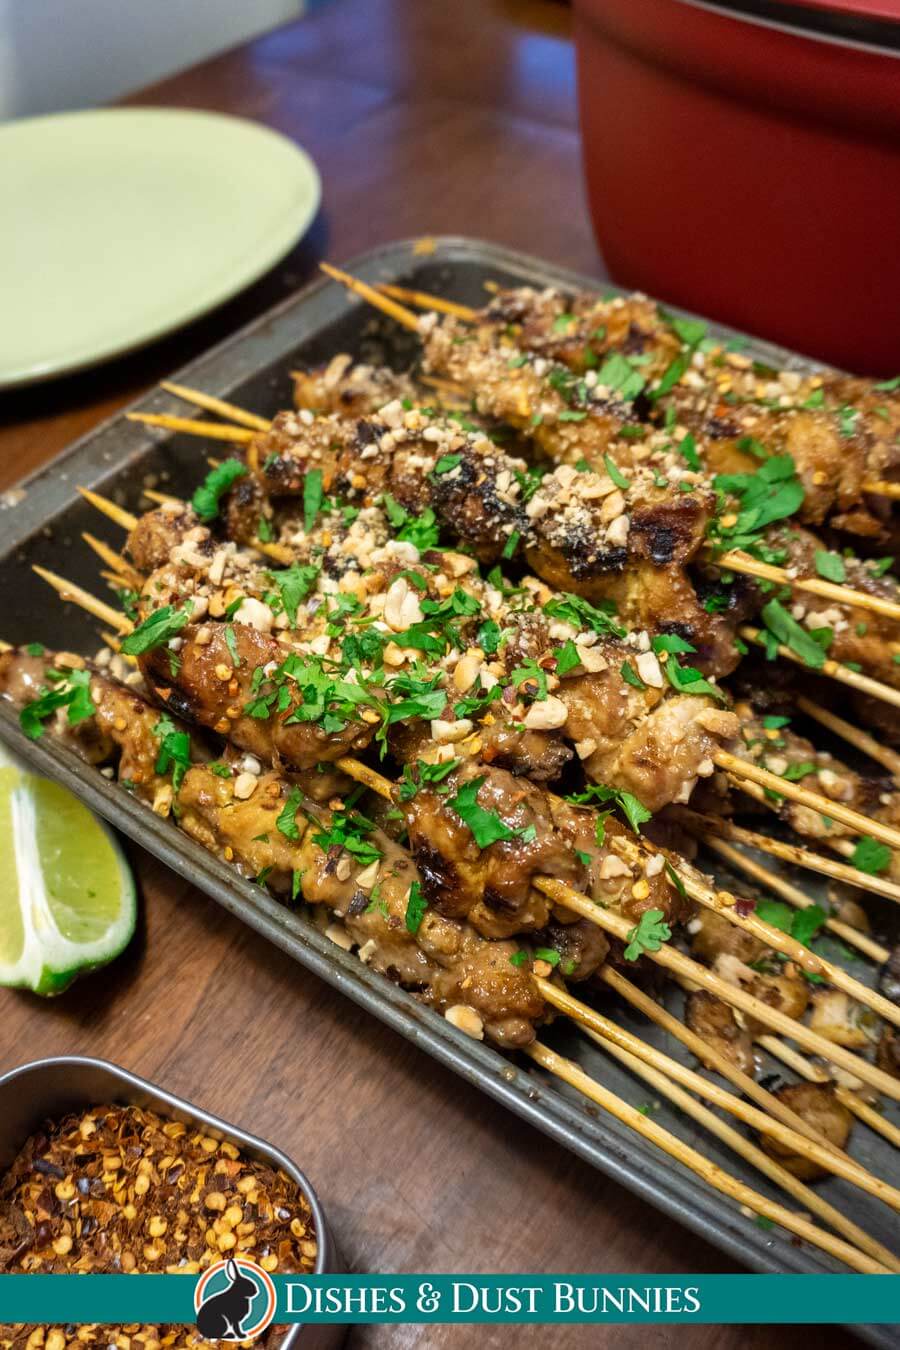
Thai Chicken Satay Skewers
Try these delicious Thai Chicken Satay Skewers for your next meal! Juicy chicken skewers marinated in a savory combination of spices, served with a creamy peanut sauce. A perfect balance of sweet, salty and spicy flavors that will have you coming back for more!

Thai food is awesome.
Years ago when I moved to Toronto I was able to have my first taste of authentic Thai food and have loved it ever since.
One of my favorite Thai foods are those yummy meat skewers called “satay”. Since I like to make things at home rather than spend money on take-out I've created my own version.
This is a chicken satay recipe, however you could also use beef in the marinade if you prefer. The marinade is made of a deliciously fragrant combination of coconut milk, curry powder, cilantro, a little bit of brown sugar and some fish sauce.
Whatever meat you choose, the flavors will taste best if you marinade everything overnight. You can either cook these in the oven, or you can put them on the grill. Either way they taste and smell amazing!
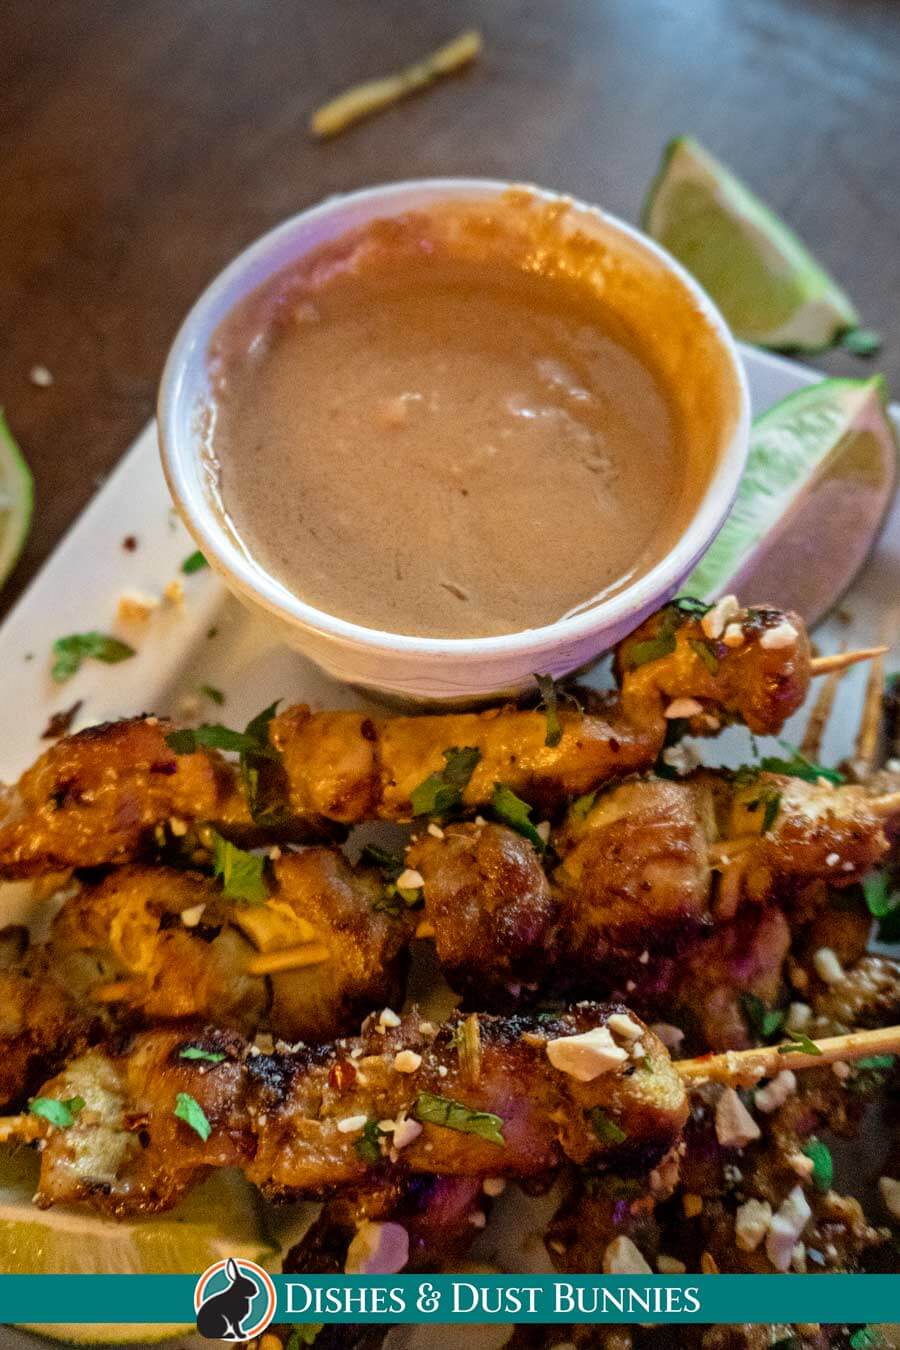
Serve these with some delicious Thai peanut dipping sauce and you've got yourself an awesome appetizer for your next get-together!
This Thai Chicken Satay recipe pairs perfectly with the recipe for my homemade Thai peanut dipping sauce, so be sure to check that out for the ideal accompaniment. You can eat chicken satay skewers without Thai peanut dipping sauce but I highly recommend having it together or else it just doesn't feel complete.

What is Chicken Satay?
Chicken Satay is a popular Southeast Asian dish that consists of marinated, skewered chicken pieces that are grilled or roasted and then served with various dipping sauces.
The key ingredient for authentic Thai Chicken Satay Skewers is the marinade which gives the chicken its unique flavor.
Chicken Satay is a great way to enjoy the flavors of Thailand and it can be enjoyed as an appetizer, a main course, or even as a snack. The dish is especially popular in Indonesia and Malaysia, but can now be found in many countries around the world.

What is Chicken Satay made of?
Chicken Satay is made up of chicken thighs that have been marinated in a blend of spices and herbs, then skewered on bamboo sticks. Chicken breasts can also be used but I find chicken thighs to be more juicy and flavorful than chicken breast.
The ingredients for the chicken marinade are garlic, ginger, lemongrass, coconut milk, soy sauce, brown sugar, turmeric, cumin, coriander, crushed red pepper flakes, curry powder, lime juice and fish sauce.
This marinade gives the chicken its unique flavor and helps keep it tender during cooking. Once the chicken is skewered onto bamboo sticks, it can be grilled until cooked through or roasted in an oven.

Does chicken satay have peanuts?
it is recommended that you brush your chicken satay with peanut sauce before you serve the skewers to your guests and that you additionally sprinkle some finely chopped peanut overtop of the cooked skewers before serving. The infusion of chicken and peanut sauce and the topping with peanuts gives satay a unique texture and flavor which sets it apart from other types of grilled chicken dishes. Not only do peanuts give a subtle crunch but they also bring out all of the other flavors like lemongrass, garlic, ginger, and fish sauce. Peanuts are a staple in not just in Thai cooking but in all Southeast Asian cooking in general.

What is satay sauce?
How to make Peanut Sauce for Chicken Satay
Satay sauce is commonly known as Thai Peanut Sauce and it serves to make Satay skewers stand out from other grilled chicken dishes. The link to my recipe for peanut sauce is here. The sauce is used by brushing it on satay skewers and is served on the side as a dip.
My satay peanut sauce recipe is made by combining ingredients such as creamy peanut butter, garlic, ginger, coconut milk, fish sauce, vegetable oil, soy sauce, chili garlic paste and lime juice as well as using chopped peanuts as a garnish.
Store bought peanut butter makes for a quicker, easier recipe but you also use natural peanut butter by grinding up peanuts yourself. Click ahead to see the full instructions for making my homemade satay sauce / Thai peanut sauce recipe. You can alternatively use store bought satay sauce which will be commonly labeled Thai peanut Sauce on store shelves.

Be sure to see the recipe card at the bottom of the post for full ingredients & instructions!
Alternative Cooking Methods
There are several different ways to cook your chicken satay skewers! My favorite method is grilling, but you can cook these in the oven or stove top in a frying pan or similar cookware.
There are a few different ways to cook chicken satay but grilling on a barbeque or stove top griddle is perfect for browning your satay skewers and adding a smokey barbeque flavor to them (especially on a charcoal grill). This is the most flavorful way of preparing and sizzling your chicken satay skewers!
Please note that the instructions included below are just an overview, the full instructions can be found in the recipe card at the bottom of this post.
How to Cook Satay on a Grill
Heat the grill to medium-high heat (around 400°F). Place the skewers onto the preheated surface and close the lid to keep in as much heat as possible. Cook for 8-10 minutes until golden brown and done throughout – turning every few minutes for even cooking.
How to Cook Satay in the Oven
Preheat your oven to 425°F (220°C). Add a drizzle of oil to an oven-safe baking tray and spread it around before placing the skewers onto it – make sure not to overcrowd them!
Bake in preheated oven for 20-25 minutes until golden brown and done throughout – turn every few minutes for even cooking using tongs or a spatula if needed.
How to Cook Satay in a Frying Pan/Stove top/Flat top
Stove-top pan frying yields tender and juicy chicken satay skewers that don’t require too much effort. Heat a large skillet over medium heat with 2 tablespoons of vegetable oil, add the marinated chicken skewers onto the skillet and fry for four minutes per side, or until cooked through. You can use a non-stick pan on the stovetop over medium heat to quickly reheat them while preserving all their juiciness and flavor.
Whichever way you choose to cook or reheat them, these Thai Chicken Satay Skewers are sure to please!

Recipe Variations
If you want an extra kick of flavor, try adding some red curry paste and finely sliced Thai chilis or jalapenos (not traditional to the dish but they work well!) to the chicken satay marinade. The added heat and spice will give your skewers an amazing depth of flavor.

Can I make Chicken Satay ahead of time?
In the refrigerator, You can marinate the chicken in a bag or an airtight container a day or two ahead of serving. Do not cook until ready to serve. Chicken satay is best cooked fresh.

How to Store and Reheat Leftover Chicken Satay
To store: Store any leftover chicken satay in a tightly sealed container in the refrigerator for up to 4 days.
To reheat: Place the chicken satay on a baking sheet and cover loosely with aluminum foil. Bake at 350°F until it’s heated through, about 10-15 minutes. Alternatively, you can also use an air fryer set to 400°F for 4-5 minutes.
Can I freeze Chicken Satay?
Yes, you can freeze chicken satay! You can either freeze the marinaded meat unskewered in an air tight bag or container, or you can freeze them prepared on their skewers ready to grill.

How long is leftover Chicken Satay good for?
Leftover Chicken Satay Skewers are best eaten within two days of cooking. If you plan to save any for later, keep them stored in an air-tight container or zip-top bag in the fridge. They’ll stay good for up to four days.
Alternatively, you can also freeze your satay skewers. Place them in a freezer-safe bag or container and freeze for up to 3 months.
When ready to eat, thaw completely in the refrigerator before reheating.
What to Serve with Chicken Satay
As mentioned, the most popular way to serve chicken satay skewers is by dipping or slathering them with what's commonly known as Thai peanut sauce. This adds a creamy, nutty flavor that pairs perfectly with the savory spices of the chicken dish. Recommended to serve together and essential for getting the full authentic experience.
Chicken satay goes well served along with most other Thai recipes, but you can also serve it along with other Asian inspired dishes.
Another tasty side that pairs well with chicken satay is sticky rice, fried rice or coconut rice.
Other Recipes You'll Enjoy

Thai Chicken Satay Skewers
- Total Time: 4 hours 35 minutes
- Yield: 10–12 skewers 1x
Ingredients
- 2 lbs boneless skinless chicken thighs, cut into 2 strips each
- 4–5 cloves garlic, minced
- 1 stock of lemongrass
Only use the bottom white part – discard the outer hard layer, then chop roughly. Mince in a food processor - 1” fresh ginger, minced/grated
- ¾ cup coconut milk
- ¼ cup soy sauce
- 3 tbsps brown sugar
- ½ tsp turmeric
- ½ tsp cumin
- ½ tsp coriander
- ½ tsp curry powder
- ¼ tsp crushed red pepper flakes
- 1 tbsp fish sauce
- juice of 1 lime
- wooden skewers, presoaked in water for a few hours
For Serving:
The amounts for this section are up to you! I like to prepare a whole lot of extras to sprinkle on my satay skewers!
- red Thai chili, thinly sliced
- fresh cilantro, roughly chopped
- red onion, thinly sliced
- chopped/crushed peanuts
- lime wedges, for sprinkling over the skewers
- Thai Peanut sauce – This is a must have along with your chicken Satay skewers!

Instructions
Create the Marinade and Prepare the Chicken
- Combine all the ingredients for the marinade. I find the easiest way to prepare the marinade is to use a food processor. I start with processing the garlic, lemongrass and fresh ginger, then add the remaining ingredients and pulse until combined.
- Combine the chicken with the marinade (in a zip lock baggie or other air tight container) and allow to chill for at least 4 hours or overnight.
- Once the chicken has marinated, push the pieces of chicken onto the skewers (I like to do a zig zag pattern with the chicken). Set aside until ready to cook. Discard any unused marinade.
To cook Chicken Satay on a Grill
This is my preferred and recommended method for cooking chicken satay.
I like to cook my satay skewers on my indoor grill/panini press, but you can also grill them on your BBQ.
- Heat the grill to medium-high heat (around 400°F). Place the skewers onto the preheated surface and close the lid to keep in as much heat as possible. Cook for 8-10 minutes until golden brown and done throughout – turning every few minutes for even cooking.
- Serve hot off the grill with extra sauce or condiments such as chili paste or peanut sauce! Enjoy!
To Cook Chicken Satay in the Oven
- Preheat your oven to 425°F (220°C). Add a drizzle of oil to an oven-safe baking tray and spread it around before placing the skewers onto it – make sure not to overcrowd them!
- Bake in preheated oven for 20-25 minutes until golden brown and done throughout – turn every few minutes for even cooking using tongs or a spatula if needed.
- Serve hot out of the oven with extra sauce or condiments such as chili paste or peanut sauce! Enjoy!
How to Cook Satay in Frying pan/Stove Top
- Heat a large skillet over medium heat with 2 tablespoons of vegetable oil, add the marinated chicken skewers onto the skillet and fry for four minutes per side, or until cooked through.
- Serve hot out of the oven with extra sauce or condiments such as chili paste or peanut sauce! Enjoy!
To Serve Chicken Satay:
- Once your chicken satay has finished cooking, brush each skewer with a little peanut sauce while still warm. This will help the other ingredients stick to the skewers when serving them.
- Lay the skewers on a serving plate. Sprinkle with crushed peanuts, sliced Thai chilis, chopped cilantro, and red onion slices.
- Serve with a side of more peanut sauce for dipping, and some lime wedges for sprinkling as you eat!
- Prep Time: 10 minutes
- Time to Marinate: 4 hours
- Cook Time: 25 minutes
- Category: Main
- Method: Grill/Oven
- Cuisine: Thai
I totally love thai food, the coconut flavor dishes are awesome. Chicken Satay is my favorite apetizer. Thanks for sharing the recipe will try at home now.
Thai food is my favorite. This recipe looks so yum and also easy enough so that I can follow it and not totally mess up the entire dish ♥ Thanks for this yumminess
Oh gosh, now this looks soo perfect and soo delicious!
Oh wow those look amazing. We just love anything grilled on skewers. So much fun to eat!
These look amazing! I can’t wait to make them!
I don’t eat meat, but that looks simply delicious! I know that my son would love this since he loves chicken.
I love anything on a skewer! It’s so much easier to cook and eat. A lot of fun!
Don’t those look really tasty! They look like something you would get at the fair. That’s my type of food!
These look really interesting and tasty. Thanks so much for the great recipe.
Chicken is my favorite protein and I love to grill it on skewers like this. The Thai peanut dipping sauce sounds marvelous!
Ohh my gosh – these look delicious! I am going to pin these for later :]
I’ve never really tried Thai food before and I’m not sure why. These look really great!
This recipe just calls my name. I’m not sure if I’ll be able to avoid making this one soon.
This is one of my favorites – I like to serve for cocktails. One thing that’s important for me when making Thai chicken skewers to serve it and make sure people enjoy while it’s still hot ( best way to enjoy them ) and I like mine really spicy.
These look delicious. I haven’t had chicken skewers in a long time. We love chicken in our house so this recipe is perfect.
Oh yummy! My son just saw the picture and said “Can we make that? Please?”
This looks so delicious. I will have to try it this weekend for my BBQ. I am sure it will be a big hit.
These look delicious. I am going to show my husband. This is right in line with dishes he adores.
Thai food is delish, but since I don’t like my food too spicy, I just tell the waiter what level of spiciness I prefer. I’ve never had this. Going to try making them soon.
I’ve been doing a lot of cooking lately and these look really good. I love skewers because they make any food to eat. I’m a fan of the dipping sauce too.
I make a version similar to this. They are my go-to for informal get-togethers where I want to bring an appy. Everyone always loves them.
Oh yum. These look so good! I love chicken and kabob/skewers! So good. I will have to try these!
This looks delicious. I would love to try this out at our next party. I am sure that these would be an absolute hit.
These Thai chicken skewers look absolutely great! I am craving some now and wish I could come through the screen and try one now!
That looks delicious. We love Chicken Satay and I always make this for my family.
Those skewers do look tasty. I bet my kids (grown) would love if I made this for them the next time we’re all together.
This looks delicious! I have never had Thai Food. I would certainly be open to trying it at least once.
These look so delicious, thank you so much for sharing and teasing my taste buds 🙂
Wow those look so tasty. I’d love to try this and maybe look up some Thai sides to go with it.
Yum! I love chicken satay – your recipe looks great, will have to try!
To me, food looks and taste better when it’s on a skewer. What a great way to serve chicken.
Mmm this looks good! I love chicken but struggle to come up with ways to change it up sometimes. I’ll have to give this a try.
This looks like a very yummy recipe. I love cooking with skewers. This looks another recipe I plan on adding to my list.
This looks really good! I would love to try that dipping sauce too. I don’t think I’ve ever actually had Thai, but I do love all of the ingredients that are usually in Thai food. This one looks like a perfect alternative to take-out!
I’ll definitely be having my husband grill some of these up for the 4th. They look absolutely delicious.
I love chicken on skewers, but I haven’t tried it satay style. I saw a kit the other day, but I wasn’t sure if I’d like it. I may have to just take the risk because this looks good!
I actually just had Thai chicken for the first time on Friday night. Now I am completely hooked because it was amazing.