
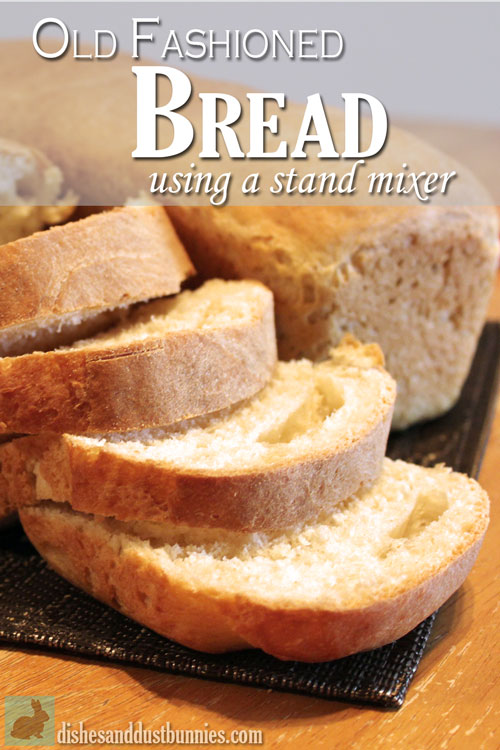
Old Fashioned Bread using a Stand Mixer
Looking for a taste of nostalgia? Look no further than our old fashioned bread recipe! Made with simple ingredients and baked to golden perfection, this bread will transport you back in time with its classic flavor and aroma. Perfect for sandwiches, toast, or simply slathered with butter, this bread is sure to become a staple in your kitchen. Try it out today and savor the taste of tradition!
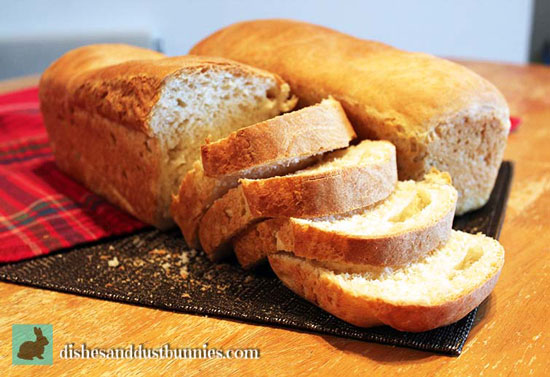
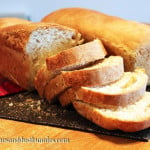
This recipe makes a deliciously soft and fluffy loaf with a golden crust that is just amazing!
Here's What Our Readers Are Saying About This Recipe
“It came out beautifully and was such a simple recipe! I will definitely make it again!” – Lori from Pinterest
“First time making bread and this recipe is PERFECTTTTTTT so yummy and amazing for sandwiches. not overly dense, but soft and fluffy, but not crumbly and falling apart.” – Rachel from Pinterest
“This was the easiest bread I’ve ever made and it turned out perfect!” – Lisa from Pinterest
This reminds me so much of the bread that my grandmother used to make back home in New Brunswick, Canada. She used to make it in the old wood stove and one of my earliest memories is of the scent wafting through the old house and up into my room as a kid when I stayed there.
I love the convenience that my stand mixer gives in creating batches of deliciousness for my family. If you have a stand mixer you should definitely try this out.
I hope you enjoy this recipe! ❤️ If you give it a try, please let me know how it turned out for you in the comments section at the bottom of the page or share a pic of your om noms on Instagram and tag @dishesanddustbunnies! ❤️
Be sure to see the recipe card at the bottom of the post for full ingredients & instructions!
How to Make Old-Fashioned Bread Using a Stand Mixer – Overview
You can find the full recipe details, including ingredient amounts and the full instructions in the recipe card at the bottom of this post, but first, here's a quick overview of how to make homemade bread from scratch using a stand mixer!
This recipe for old-fashioned bread using a stand mixer simplifies the process of making homemade bread while still delivering that classic, homemade taste we all love. With just a few basic ingredients like flour, yeast, water, and a touch of sugar, you can create a loaf that’s soft, fluffy, and perfect for sandwiches, toast, or enjoying warm with butter.
The stand mixer does most of the work, kneading the dough to perfection while you relax, but don’t worry if you don’t have one—this dough can just as easily be kneaded by hand. From mixing to baking, the steps are easy to follow, making this recipe ideal for both beginners and seasoned bakers alike.
The instructions are quite easy as well and I've outlined everything in detail below. Basically you just prepare the yeast and get it all foamy, combine this with the rest of the wet ingredients in a large measuring cup, and then pour the mix into the stand mixer with your dry ingredients. Be sure to have all your ingredients measured out and ready to go before you begin and it's a breeze! I've made this so many times that I now have it pretty much memorized!
Tips for Perfect Bread
Making old-fashioned bread is straightforward, but a few tips can help you achieve the best results:
- Use Fresh Ingredients: Ensure your yeast is fresh and active for a good rise. Check the expiration date before starting.
- Warm, Not Hot, Liquids: Use lukewarm water to activate the yeast; too hot can kill it, and too cold won’t activate it properly.
- Don’t Skip the Kneading: Whether using a stand mixer or hand-kneading, make sure the dough is smooth and elastic to develop the gluten properly.
- Watch the Proofing Time: Over-proofed dough can collapse, so keep an eye on it. It should double in size, not more.
- Get a Golden Crust: Brush the top with melted butter before baking for a soft crust or leave it plain for a crunchier finish.
Recipe Variations
Old-fashioned bread is a versatile recipe that can be customized to suit your preferences:
- Whole Wheat Bread: Swap half of the all-purpose flour with whole wheat flour for a nuttier flavor.
- Herbed Bread: Add dried herbs like rosemary, thyme, or oregano to the dough for an aromatic twist.
- Seeded Bread: Sprinkle sesame seeds, poppy seeds, or sunflower seeds on top of the dough before baking for added texture.
- Sweet Bread: Mix in a tablespoon of honey or sugar for a touch of sweetness.
- Cheese Bread: Fold in shredded cheese like cheddar or parmesan for a savory variation.
FAQs
Can I use whole wheat flour instead?
Yes, you can substitute half or all of the all-purpose flour with whole wheat flour. Keep in mind that the texture may be denser.
Can I freeze the dough or baked bread?
Yes, you can freeze the dough after the first rise. Thaw and let it rise again before baking. Baked bread freezes well; wrap tightly and freeze for up to three months.
Do I Have to Use a Stand Mixer? Can I Knead the Dough by Hand?
No stand mixer? No problem! While this recipe is designed for the convenience of a stand mixer, you can absolutely knead the dough by hand. The process might take a little more time and effort, but it’s a perfectly effective way to create a delicious loaf of bread. Kneading by hand allows you to feel the dough come together and develop elasticity, making it a rewarding and tactile experience. Whether you use a mixer or go the traditional route, this bread will turn out beautifully!
Can I Make Old-Fashioned Bread Ahead of Time?
Absolutely! To save time, you can prepare the dough in advance. After kneading, cover it tightly and refrigerate for up to 24 hours. When ready to bake, allow the dough to come to room temperature and complete its final rise before baking. This method is perfect for fresh-baked bread on busy days.
Storage and Reheating Instructions
To keep your bread fresh:
- Room Temperature: Store in a sealed plastic bag or bread box for 2–3 days.
- Refrigeration: Not recommended as it can dry out the bread, but it works for up to a week if necessary.
- Freezing: Wrap the loaf tightly in plastic wrap and foil, then freeze for up to 3 months. When ready to enjoy, thaw the bread at room temperature.
- Warming Bread for Freshness: To bring back the fresh-baked feel, warm whole loaves or slices in the oven at 350°F for about 10 minutes. This enhances the texture and aroma, making it taste like it just came out of the oven! For individual slices, a toaster works perfectly for a quick refresh.
What to Serve with Old-Fashioned Bread?
Old-fashioned bread pairs beautifully with so many dishes. Enjoy it with hearty soups like chicken noodle or beef stew, or use it as a base for your favorite sandwiches. Toast a slice and spread it with homemade jam or creamy butter for a comforting snack. It’s also excellent alongside pasta dishes or casseroles. The versatility of this bread makes it the perfect addition to almost any meal!
Other Recipes You'll Enjoy
If you loved making this old-fashioned bread, there’s a whole world of homemade baking to explore. From the rustic charm of Bread & Baked Goods to the cozy indulgence of Comfort Food, there’s always something delicious to create in your kitchen.
Baking is all about bringing warmth and joy to your home, whether you’re crafting a simple loaf of bread or experimenting with sweet treats and savory bakes. Keep the flour flying and your oven warm—happy baking!
Old Fashioned White Bread using the Stand Mixer
- Total Time: 45 minutes
- Yield: 2 Loaves of bread 1x
Ingredients
- 2 cups warm water in a large measuring cup
- ⅓ cup sugar
- 1 ½ tbsp active dry yeast
- 1 ½ tsps salt
- ¼ cup canola or vegetable oil
- 5–6 cups bread flour, separated

Instructions
For the Yeast Mixture:
- You will need the water, yeast, and sugar for this step.
- Spoon the active dry yeast into a measuring cup and add about 1 tsp of the sugar (it's ok if it's a little more).
- Add about 1/4 cup of the warm water to the yeast and sugar. Stir it up and let it rise for about 10 minutes until it's frothy.
- Combine the remaining water and the oil and set it aside until needed.
- While waiting for the yeast mixture to foam up prepare the dry ingredients.
For the dry ingredients:
- In the stand mixer add 4 cups of the flour along with the remaining sugar as well as the salt. Set the mixer to ‘Stir” using the hook attachment. In a couple minutes the dry ingredients should be well combined.
- Check on your yeast mixture. If it's frothy and foamy it's ready to use. Now to make things simple add the contents of the measuring cup with the water and oil to the measuring cup with the yeast.
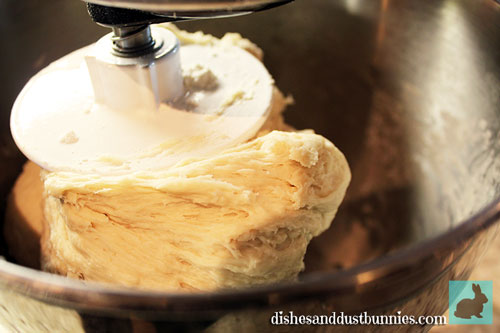
- With your mixer speed set to 1 or stir, gradually pour in the contents of the wet ingredients. Turn up the speed to 2 and mix for about 5 min.
- Set your mixer back to speed 1 (or stir). Now begin adding the remaining flour 1/2 a cup at a time. Mix together for about 10 on speed 2. The dough should be coming together in the mixer bowl and should be no longer sticking to the sides when it's done mixing. You can add a little more flour if it's still too sticky.
- Now temporarily remove the dough from the bowl and form it into a ball. Using cooking spray coat the inside of the bowl and put the dough back in the bowl and use cooking spay on top as well. Next cover the top of the bowl with plastic wrap and put in a warm place to rise until doubled in size (should take about 30 min).
- Once the dough has doubled in size punch it down and remove it from the bowl. Let the dough rest for about 10 minutes. Once rested divide the dough into 2 equal portions in the form of a ball.
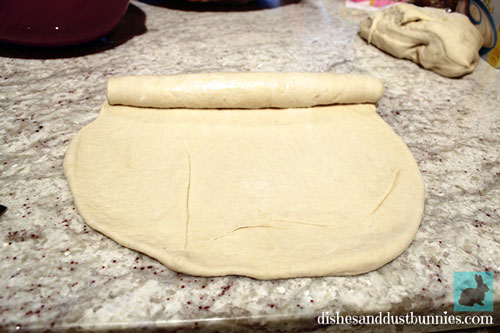
- Take one of your dough balls and roll it out on a floured surface using rolling pin. Roll out the ball roughly into the shape of a rectangle.
- Now roll the rectangle up to form sort of a log and turn the ends in. Place the log (seam down) into a bread pan coated with cooking spray. Then spray the top of the dough as well. Repeat the previous steps with the other portion of dough.
- Place the two prepared bread pans in a warm place to rise until the dough is about 1 inch or so above the pans (This should take about 35-45 min).
- Once risen place into the oven (pre-heated to 350°F) and bake for 30 min or until top is golden.
- When the bread is finished baking empty the pans onto a cooling rack.
Alternate Instructions for Hand-Kneading the Dough
If you prefer to knead the dough by hand instead of using a stand mixer, simply mix the ingredients in a large bowl and knead on a lightly floured surface for about 8–10 minutes, or until the dough becomes smooth and elastic. Follow the remaining steps as outlined in the recipe.
Notes
Tip: When I rise the bread dough I place my loaves into my oven which has been preheated to 200°F and then switched off. This gives the dough just the right amount of heat to allow them to rise without baking them before they're ready. Make sure the oven has been switched off before letting your dough rise in there though!
- Prep Time: 15 minutes
- Cook Time: 30 minutes
- Category: Bread
- Method: Stand Mixer, Oven
I have made this bread several times and it always turns out perfect!
Yes, you certainly can! 🙂
Do you have to use bread flour? I only have all purpose flour at home.
Hi Diana,
From time to time I do use all purpose flour to make this recipe if I’m out of bread flour. The only difference I notice with the all purpose flour is that the bread doesn’t rise as high. It still tastes great but it’s just a little less fluffy.
Hope this helps! Thanks so much for stopping by! 🙂
Michelle