These muffins are the ultimate in bakery style chocolate chip muffins. They're soft, fluffy and loaded with delicious chocolate chips. Plus, they're easy to make and require just a few simple ingredients, and delicious with your morning coffee or any time! So if you're looking for an amazing muffin recipe that will knock your socks off, then this is it!
Many of you found my site originally through this recipe as it was one of my very first posts to go viral. It's been a reader favourite since 2015, with over 200K shares across social media! Wow! Thank you so much to everyone who's tried the recipe and to those who haven't tried it yet, I'm so excited for you to dig in!

*This post has been updated from an earlier version to include a few tweaks and more detailed information to the original recipe to make it even more scrumptious!*
These muffins are such yummy treats – they taste great no matter what time of the day or occasion you have them. They're great with breakfast, as a snack or even for a dessert.
These fluffy and easy chocolate chip muffins are perfect for satisfying your craving for yumminess!
I remember when I was growing up there were some absolutely amazing chocolate chip muffins sold in my school's cafeteria. I realize that normally when a person thinks of school cafeterias they probably don't automatically think of deliciousness, but it makes me think about the amazing muffins they had!
Those things were handmade by our caring and motherly cafeteria lady and were something special. They were so good that they could have been compared to homemade bakery style muffins! You know, the ones with the giant muffin top? …. drool….
I made these muffins as sort of a tribute to those amazing ones I remember having back in school. These are moist, soft and fluffy and have just the perfect amount of muffin top puffed upness (I don't think that's a proper word – but you know what I mean! lol).
One of the things I've noticed fancy bakery shops do is to add a little coarse sugar to the tops of their chocolate chip muffins. Although this is optional I just couldn't resist putting some on! It gives the tops a nice little sweet crunch when you take a bite and it looks so pretty! Nothing better than a “blinged” out muffin! lol
I hope you enjoy this recipe! ❤️ If you give it a try, please let me know how it turned out for you in the comments section at the bottom of the page or share a pic of your om noms on Instagram and tag @dishesanddustbunnies! ❤️
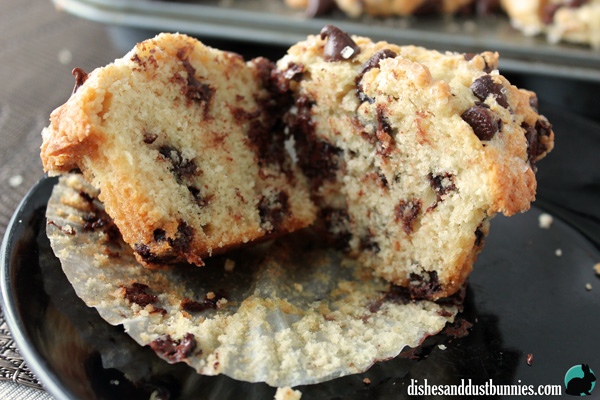
What makes this the Ultimate Chocolate Chip Muffin Recipe?
These muffins have it all–a tall, domed top, crackly sugar-crusted top, and a moist and tender crumb. This is the chocolate chip muffin recipe you've been searching for!
I'm confident in this claim because I've tested this recipe dozens of times (literally!) to get it just right. And trust me when I say that these are THE BEST chocolate chip muffins you will ever make at home!
The tall, domed top is key for bakery style muffins! No one likes a flat muffin, right?
Be sure to see the recipe card at the bottom of the post for full ingredients & instructions!
How to make Bakery Style Chocolate Chip Muffins from scratch – an Overview
Before we jump into the full recipe at the bottom of the page, there are a few important things to keep in mind to make sure your chocolate chip muffins turn out as irresistible and as delicious as possible. 😋 Below is a quick run through on how to make sure your chocolate chip muffins turn out absolutely perfect every single time.
Preheat the oven to 425 degrees Fahrenheit and coat a muffin pan with nonstick cooking spray before adding paper liners. Combine the dry ingredients, including sugar, in a bowl and stir in 1 ¾ cups of semi sweet chocolate chips. In a separate bowl, combine wet ingredients including melted unsalted butter and eggs before stirring in milk and vanilla extract.
To make fluffy and moist muffins, do not over mix the wet and dry ingredients, then scoop out the batter evenly into each section of a muffin pan. Sprinkle the tops with the remaining chocolate chips and coarse decorative sugar.
Bake the muffins at 425 degrees Fahrenheit for 7 minutes, then reduce the heat to 375 degrees and bake for an additional 15-20 minutes.
The change in temperature during the baking process is important in creating the domed tall muffin top. High heat, in the beginning, will make the domes rise up quickly, then when heat is reduced it'll safely finish the baking process without burning or overdoing the muffins.
Once they're finished baking, let the muffins cool in the pan for 5-10 minutes before transferring to a cooling rack.
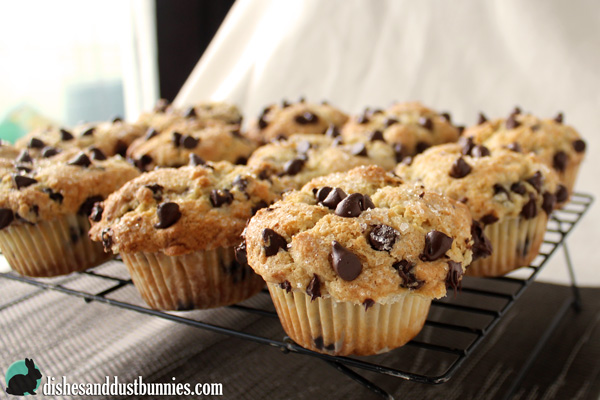
How do you make my chocolate chip muffins rise really big on top?
How to Create that irresistible tall Muffin Top Dome:
- Start at a High Temperature, then continue to bake at a lower temperature – If you're looking for a nice puffed up muffin top, make sure that you pay close attention to the adjustment to the heating temperatures during the baking process.
In this recipe, I use a higher temperature at the beginning of the baking process and this ensures that those lovely tops puff up just right. Keep in mind that your oven's internal temperature may vary from mine so keep an eye on them. - After Mixing, Bake them ASAP – If you wait too long to put the muffins in the oven after mixing the batter, they may not rise as much as you want. You should try to preheat your oven ahead of time, so it'll be ready when you are. If you are using baking soda in your muffin recipe, it's especially important to pay attention to this tip. As soon as you finish mixing the batter, it's best to pour it into the muffin tins, then put the tins in the oven to start baking as soon as possible.
If you wait too long, the leavening agent may lose its efficacy and your muffins might not achieve the domed tops that you're hoping for. The leavening process starts as soon as you mix the wet and dry ingredients, so if you wait too long to bake the batter, it won't work as well. The muffins might rise a bit, but they won't rise as high as they could if you had been faster. - Fill the Muffin Tins to the top – If you want your muffins to have that nice, rounded top like you see in bakeries, be sure to fill the muffin cups all the way to the top. This may seem like common sense, but I've seen so many people make the mistake of not filling them high enough and then they end up with flat muffins. So don't be afraid to really mound that batter up!
What temperature is best to bake muffins?
For this recipe and to make sure your muffin tops rise properly, we start the oven temperature at 425°F, bake for 7 minutes, then lower the temperature to 375°F and continue baking for 15-20 minutes.
If you're nervous about the change of temperatures during the baking process, no worries! Many of my readers have baked their muffins at 350°F for 15-20 minutes total and have had no issues! Personally, I find that starting with the higher temperature, then lowering it has an amazing effect in creating those lovely large and tall muffin tops we all love!
Be sure to see the recipe card at the bottom of the post for full ingredients & instructions!
Tips for Perfect Muffins Every Time
- Make Sure your Oven Temperature is Right – Sometimes an oven's temperature can run hotter or even cooler than what the dial indicates, which is often the case with older appliances.
Knowing the actual internal temperature of your oven is important in making sure that your muffins and other baked goodies turn out exactly how you want them. If you haven’t already, I would suggest picking up an inexpensive oven thermometer to test the internal temperature of your oven. Set your oven to 350°F and place the thermometer inside. Once your oven says that it is preheated to the desired temperature, compare this to what it says on the thermometer. If you notice a big difference, don’t stress – just go by the temperature readings of what your thermometer says from now on, rather than what’s on the dial. - Accurately Measure Your Ingredients – They say that baking is a science and sometimes I think whoever “they” are, are right. lol
I’ve been guilty of not accurately measuring the dry ingredients in a recipe simply because I’ve been in a hurry, and it really makes a difference to the quality of the end result.
It’s important that when you’re measuring your dry ingredients, you use the proper measuring cups and level off what you’re measuring using a flat tool such as a knife or spatula. Also, make sure that you measure the wet ingredients using cups with a lip. It's best to use a clear measuring cup so you can make sure the amounts are exactly where they need to be.
Professional bakers will often weigh their ingredients rather than measure by the cup – usually when using ingredients like cake flour, etc. While this isn't absolutely necessary, it's something to keep in mind and maybe experiment with. 🙂 - How to prevent dense/dried out muffins: Don’t over mix the batter –
To prevent dry or dense muffins, make sure to only mix the muffin batter until the ingredients just come together. When you’re making muffins, you never need to stir the batter for more than a couple seconds.
Seriously, only stir as long as it takes for the dry ingredients to just start to dissolve into the wet ingredients and no more. If you’re too vigorous when stirring the batter, you’ll end up a dense puck for a muffin. - Use fresh ingredients – When a recipe calls for baking soda or baking powder, please make sure that it is fresh. The older the baking soda or baking powder, the less effective it will be. If you use old baking soda or baking powder, your recipe might not turn out right because it might not rise.
- If you live at a higher altitude, the recipe might need a little added moisture -In some locations, it's important to add a little more moisture to recipes because the air is drier. If you live at a high altitude and your baked goods come out dry, try adding a tablespoon or two of vegetable oil or applesauce to the recipe next time.
- Test Doneness with the Toothpick Test – If your muffins start to brown up or look like they're close to being done, take them out of the oven and test them with a toothpick. If the toothpick inserted comes out clean after sticking it into a muffin, they're ready!
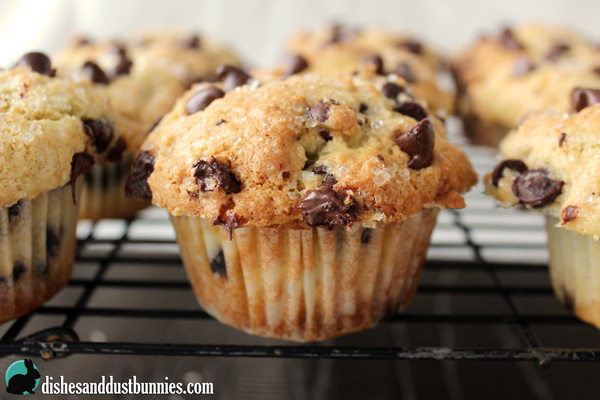
Recipe Variations
If you want to get creative with your muffins, there are a few ways you can change up this recipe. Here are a few ideas:
- Add in 1/2 cup of chopped nuts (I like pecans or walnuts)
- Swap out the chocolate chips for another type of baking chip like milk chocolate, white chocolate, peanut butter, or butterscotch. You could also use mini chocolate chips, so you have more chocolate in every bite!
- Stir in 1/4 cup of instant coffee granules into the batter for a mocha flavor
- Add a tablespoon of cinnamon to the batter for a Cinnamon Chocolate Chip Muffin
- Top the muffins with a streusel topping before baking (example: 1/4 cup brown sugar + 1/4 cup flour + 1 tablespoon melted butter)
- Turn them into double chocolate muffins by adding 1/2 cup of cocoa powder to the batter!
No matter how you choose to bake them, these muffins are sure to be a hit! Enjoy!
How to store muffins after baking
Store your freshly baked leftover muffins in an airtight container or resealable plastic bag, and make sure you put a sheet of parchment paper between each layer. This will help keep the texture and freshness as best it can!
Can I freeze Chocolate Chip Muffins?
Yes! Chocolate chip muffins freeze really well. Just place them in a freezer safe bag or container and they will last for up to 3 months. When you are ready to eat one, simply thaw it out at room temperature or pop it in the microwave for a few seconds.
If you'd like, you can even make a double batch of chocolate chip muffins and freeze half of them. That way, you always have fresh muffins on hand!
How long are chocolate chip muffins good for?
Freshly baked homemade muffins, when properly stored, will last for about 4 days. If you planning on storing them beyond that, it would be best to store in the freezer – in this case, they should be good for 3-4 months.
Now, are you ready to make the best chocolate chip muffin recipe you ever tasted?!
Other recipes you'll enjoy:

The Ultimate Bakery Style Chocolate Chip Muffins
- Total Time: 37 minutes
- Yield: 12 Muffins 1x
Ingredients
- 2 ¾ cups all purpose flour
- 1 tbsp + ¼ tsp baking powder
- 1 ¼ tsp baking soda
- ½ tsp salt
- 1 ¼ cups sugar
- ½ cup unsalted butter, melted and cooled
- 3 large eggs
- ½ cup milk
- 3 tsp vanilla
- 2 cups semi sweet chocolate chips
- Optional – 1 tbsp coarse sugar – the clear kind that's used for decorating confections,etc
Instructions
- Pre-heat the oven to 425°F.
- Using cooking spray coat the muffin pan. Make sure that the whole top of the muffin pan is covered, not just the part that the batter goes into.
- Place paper muffin/cupcake liners into the muffin pan.
- Combine dry ingredients (flour, baking powder, baking soda, salt, sugar) in a medium bowl using a whisk so that everything is well combined. Stir in 1 ¾ cups of the chocolate chips.
- In a separate bowl combine all the wet ingredients (melted butter, eggs, milk, vanilla), making sure the eggs are well incorporated.
- Pour the wet ingredients into the dry and stir until *just* combined.
IMPORTANT: Avoid over mixing! If you stir too much, the muffins will become too dense, not rise and become more like a puck. The muffins should be fluffy and moist, so all you need to do is combine the ingredients until *just* combined. Once the dry ingredients dissolve into the wet, you're done mixing! - Scoop out the batter evenly into each section of the muffin pan. Try to fill the muffin tins as close to the top as possible in order to help those delicious muffin top dome rise!
- Sprinkle the tops of the batter with the remaining chocolate chips and the coarse decorative sugar.
- Bake in the oven for 7 minutes at 425°F (middle rack) then reduce the heat to 375°F and bake for 15-20 min. (The muffins stay in the oven when you lower the temperature)
- Once the muffins are finished baking cool in the muffin pan for 5-10 minutes.
- Transfer muffins to a cooling rack. They're great served warm with a little butter. 😋
Notes
The change in temperature during the baking process is important in creating the domed muffin top. High heat, in the beginning, will make the domes pop up, then when heat is reduced it'll safely finish the baking process without burning or overdoing the muffins.
If you're nervous about the change of temperatures during the baking process, no worries! Many of my readers have baked their muffins at 350°F for 15-20 minutes total and have had no issues! Personally, I find that starting with the higher temperature, then lowering it has an amazing effect in creating those lovely large muffin tops we all love!
- Prep Time: 10 minutes
- Cook Time: 27 minutes
- Category: Baked Goods
- Method: Baking
- Cuisine: American/Canadian


