
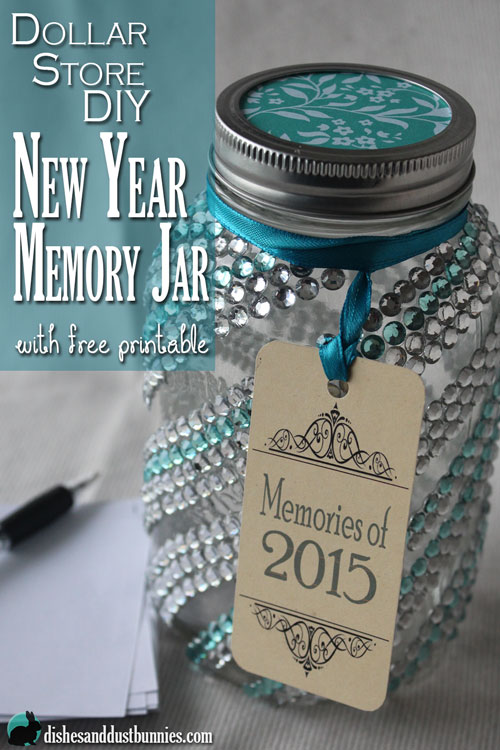
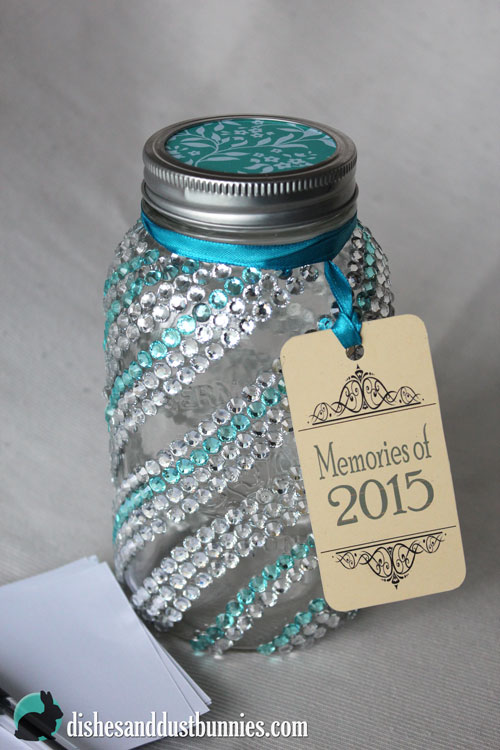
Make this Mason Jar Craft! Dollar Store DIY New Year Memory Jar
Isn’t it almost unbelievable that it’s a new year already?!
This past year was filled with good times and happy little moments in my family and I’ve been looking for a way to easily remember everything. While searching on Pinterest for mason jar craft ideas I found the inspiration to make a DIY New Year Memory Jar. I thought this would be a good way to help keep track of all the good times and wonderful little moments that happen throughout the coming year!
Using the memory jar is pretty simple – I’m plan to write little notes about the happy moments, accomplishments and things that happen throughout the year and place them into the jar. At the end of this year on New Year’s Eve we’ll open up the jar and read the little notes. This will be a nice family activity to do on New Year’s Eve! 🙂
I created my DIY New Year Memory Jar using items I either had on hand or found for super cheap at the dollar store. I’m very pleased with how it turned out and will be proud to have this on display. 🙂 It only cost about $3 to make!
A memory jar could be used for any occasion really! You could try making one as a gift for a special someone’s birthday or even for Valentine’s Day and write little love notes in it collected through the year!
Below I’ve included the details on how I created our memory jar so you can make one too!
I’ve also included a link to a FREE printable I’ve created so you can create the tags for this project! 🙂
2016 Update: Due to popular demand I've provided an updated printable sheet for 2017!
What You’ll Need
- 1 L mason jar or other large jar
- Decorative ribbon of your choice
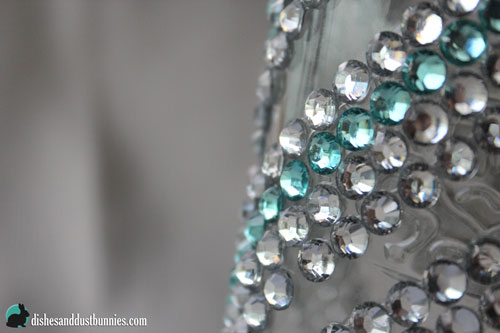
- Adhesive strips of jewels (found at the dollar store)
- Craft paper for the lid (found this at the dollar store)
- Scissors
- Hole puncher
- Heavy card stock – any color you prefer
- Printer
- New Year Memory Jar Printable
- Small note pad
- Black marker or pen (or whatever color you like)
How to Make it
1. Print the New Year Memory Jar printable on the heavy card stock.
2. Along the grey line cut out the tag you prefer to use.
3. Punch a hole through the grey circle on the tag using the hole puncher. I’ve provided a few different options depending on how you’d like your tag. You can choose a vertical or horizontal image and also have the option to customize the year or label on the tag using your marker.
4. Cut a length of ribbon to about a couple yards (I didn’t really measure this. I just estimated.) Make sure there’s enough ribbon to wrap around the rim of the jar a few times.
5. Fold the ribbon in half making a loop at the end. Push the loop through the hole in the tag and guide the loose ends through the loop so that the ribbon is now attached to the tag.
6. From the top of the tag where the ribbon is attached, measure about 1/2 inch to 1 inch up on the ribbon and make a knot.
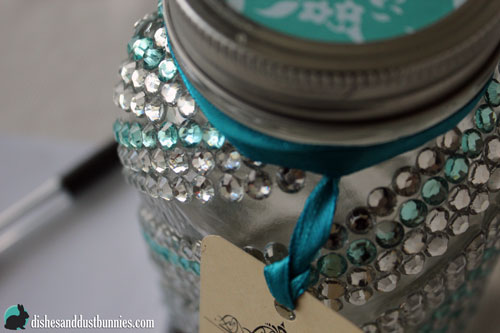
7. At the knot, separate the two lose ends of the ribbon. Wrap the loose ends of the ribbon around the mouth of the jar below the area where the lid goes. Make sure that your tags label is facing outward so you can see it.
8. Tie the ends of the ribbon with a double knot and cut off any excess.
9. Take the inside circle of your jar lid and trace a circle on the craft paper. Cut it out and place the circle so that the pretty side is visible when you put the rim on the jar lid.
10. Decorate your jar in whatever pattern you like using the adhesive jewels. You could put them on in a swirl pattern like I did or you could place them horizontally, vertically or however you like. You could even make a picture on the jar using the jewels! 🙂
I hope you enjoyed this post and that it has inspired you to create your own memory jar. You don’t have to do one just like the one I made – use your imagination with items you can find and it will be awesome!
Do you have the 2017 printable coming soon? Yours is by far my favorite of all the printables!
Hi there Nancy!
Good news! I’ve just added the updated printable for 2017! 😀
Michelle
I love this idea. thank you so much for the detailed instructions. I really love the jewels. I couldn’t find any at the dollar store but hope to find them soon. do you have a 2017 printable yet? Thank you!
Thanks so much Annalee! 🙂
I’ve just added the updated 2017 printable to the post! enjoy! 😀
Michelle
Michelle, is it possible to post a new updated sheet for 2017? I love this idea!
Hi Sandy!
I’ve just added the updated 2017 printable to the post! Glad you enjoy this little project! 😀
Michelle
Do you have a 2016 printable available yet?
Hi there!
Due to the popularity of the post I just added a new updated sheet for 2016!
Thanks and If you’d like to share it, I’d love to see an image of your jar once finished. 😀
Michelle
I made a memory jar for our mother some years back. Each of us kids wrote our favorite memories from growing up and we placed them all in the jar I decorated and gave it to her for Mother’s Day. To this day she still pulls out the memories when she is feeling blue.
Thanks so much for sharing this lovely story. It’s great to see how meaningful and special these memory jars can be for others!
Thanks so much for commenting and Happy New Year!
Michelle
I have a bunch of mason jars lying around. This would be awesome to give to a teacher at the beginning of the school year!
I think that is a great idea!
So cool! I never thought of decorating a memory jar before – it looks far more appealing this way 🙂 I think I’ll be making these for my next craft market! TFS!
Helen
Perfect family-oriented New Year’s idea, there aren’t too many of those out there! I’m such a terrible memory keeper, but absolutely live for the little mementos later, this is definitely inspiring me to make one for my family this year! I already can’t wait to read it next year (you know the time will fly by), and I haven’t even made it yet! 🙂
Thanks Nikki! 🙂
What an awesome idea! Love this!
Thanks so much Neyssa! 🙂
I’m just popping over from How To Get Organize At Home, thanks for sharing an awesome idea:)
Thanks so much Sharon! 🙂
So pretty and such a lovely idea.
I love your memory jar! It’d much fancier than mine lol.
I really love your decorative touches and BONUS dollar store items!
I absolutely Love this idea! You did a beautiful job, too! You should be proud of it! II pinned it and plan to start one myself, now!
I did a “gratitude Tree” for the month of November, that carried over into December and what a pure joy it was to see all we have to grateful for! Thanks so much for sharing your idea, Michelle!
Happy New Year!
Theresa
Thanks so much Theresa! I love how it turned out! 🙂
The gratitude tree sounds so nice – lovely idea!
Happy New Year to you as well!
I love this idea and your jar is just so fun! Thanks for sharing!
Thanks so much for stopping by! 🙂
This is such a great idea! I have a bunch of old glass jars (old poultry waterers) and this would be a great use for one of them!
By the way, I’m in the Boost class with you! I’m trying to check out everyone’s blog before we start tomorrow!
Thanks so much! It’s always great to find new uses for old things! 🙂
It’s great connecting with you as well! Looking forward to the class! 🙂
What a cute idea! How special to commemorate all the things that happen through out the year! Would be so fun to read on Dec 31st. Awesome!
Thanks so much! I can’t wait to read everything at the end of the year! 🙂
Love this! I am definitely going to do this with my family.
Thanks! 🙂
Ok, I have to admit, when I clicked over from Facebook, I expected to see something very crafty and budget looking. That looks AWESOME though! Like I want to run to my Dollar Store and make one right now! Thank you for sharing the idea. 🙂
Thanks so much Cambria!
I can’t wait to show this to my crafty girl! She’ll want to make one right away.
Awesome! It’s a really fun project and so easy to make! 🙂
This is a super cute idea. I love the colors you choose. Enjoy filling up this jar.
Thanks Christy! 🙂
Love this idea. Sharing! Happy New Year!
Happy New Year to you as well! Thanks for stopping by! 🙂
This turned out great. I love this idea and it is so pretty too!
Thanks Censie! 😀
Oh my gosh, what a super cute idea! We always reminisce about good times throughout the year but how fun would it be to read memories from the jar instead? We might need to work on this project today 🙂
Thanks for stopping by Stephanie! It’s going to be fun putting little notes in throughout the year! 🙂